RSS Feed

Posts Tagged ‘jacqueline scott’

  1. Exquisite Corpse Collaboration

    July 10, 2016 by Erin Fletcher

    ExquisiteCorpse
    As Program Chair for the New England Chapter of the Guild of Book Workers, I had the pleasure of organizing a project brought to me by one of our members. Jonathan Romain, a recent graduate of the North Bennet Street School Bookbinding Program, brought forth the idea of a collaborative project between the students at NBSS and the NEGBW. I loved this idea and so with the help of instructor Jeffrey Altepeter, we put this plan in motion.

    An Exquisite Corpse is a method of illustration invented by Surrealists in the early 1910s, where each collaborator adds to a composition in sequence usually without seeing the prior portion. Upon reveal this rule to hide the previous sequences offers up an abstract and amusing portrait. Each student created a plaquette covered in neutral leather (we used Harmatan Terracotta and Brown goatskin) and also completed the “head” portion of the figure. The plaquette’s were about 18in x 6in; allowing each participant to cover a 6in square portion of the board.

    The project spanned over 3 months as each participant received and worked on their portion over the course of a month. At the end of May, the finished pieces were on display as part of NBSS’s Student & Alumni Show, an annual exhibit that showcases work from current students and alumni from the various programs.

    I had the pleasure of receiving the finished pieces and bringing them back to the students. We gathered around one another as each student revealed the unique and strange characters that developed over the course of the project. Each piece is displayed below with a brief description from each collaborator remarking on their concept and use of materials.
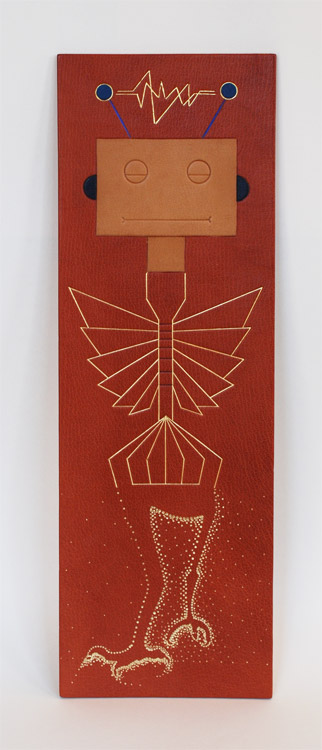
    Jeffrey Altepeter – Samuel Feinstein – Lang Ingalls

    JeffSamuelLang-Corpse
    Jeffrey Altepeter
    The robot head was inspired by my son’s fascination with mechanical and technological design and construction. It is made up of traditional leather decoration techniques—leather onlays, tooled with gold leaf, foil and carbon.


    Samuel Feinstein
    Chicago, IL

    Gold and blind tooling.


    Lang Ingalls
    Crested Butte, CO

    I opted for humor in my approach to the Exquisite Corpse. The design concept was to depict bird legs: the initial tests were for tooling in the positive; it became clear that the negative space would be more interesting. I used four sizes of “dots” in gold foil to produce the background behind the legs. Repetition and rhythm became the focal point.

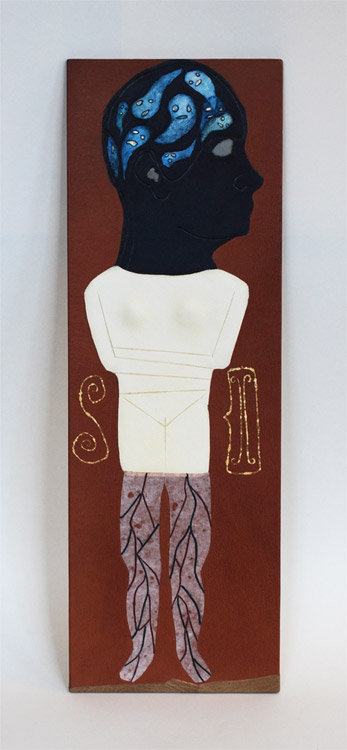
    Emily Patchin – Barbara Adams Hebard – Athena Moore
    EmilyBarbaraAthena-Corpse Emily Patchin
    This head was created as an onlay piece. The main portion was cut out of navy blue goat skin, pared thin. The sections for the eye, ear, and ghosts were all cut out, and their edges beveled on the flesh-side. Light blue leather for the eye and ear were glued to the back before pasting to the base leather. The ghosts were cut out from parchment; their faces backed with thinly pared gold leather, and painted with watercolor before being glued in place. The outline of the original drawing was then blind tooled over the leather. The intention behind the design was to look at intense personal struggles (depression, intrusive thoughts, insomnia) through a lens of whimsy and humor.

    Barbara Adams Hebard
    Melrose, MA

    Melrose, MAWhite alum-tawed goatskin onlay with blind tooled details, inspired by the shape of an Early Cycladic marble female torso (2800-2300 BC, Keros-Syros Culture). Flanking the torso are shapes commonly found incised on Early Cycladic pottery, a spiral and a two-headed ax, executed in surface gilding.


    Athena Moore
    Somerville, MA

    My materials were leather and hand-cast paper (made by the artist). The concept was a bit literal, since I had the last portion and was finishing the body with the legs, but I was inspired by a particular set of medical prints from Yale’s collection.

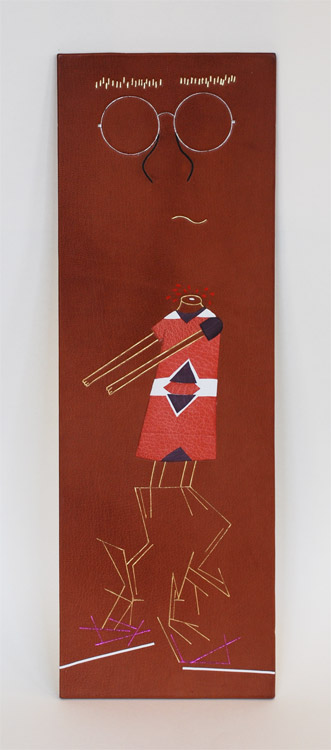
    Jonathan Romain – Erin Fletcher – James Reid-Cunningham
    JonathanErinJamesJonathan Romain
    a shapeless face, 18 karat gold, palladium, and ascona onlay


    Erin Fletcher
    Boston, MA

    I wanted to created something really playful with my portion of the plaquette. When I saw no indication of where to begin, I chose to create a headless girl with comically long arms. The girl’s dress is a series of blind tooled onlays in pink and purple goatskin and white buffalo. Her skin is gold tooled. And the blood spurting from her headless stump is painted with red acrylic.


    James Reid-Cunningham
    Cambridge, MA

    The design is largely non-representational, with a vague suggestion of legs. Otherwise, there is no concept. Tooled in gold and metallic foil, with inset lines of white box calf.

    Mary Grace Whalen – Eric Alstrom – Penelope Hall
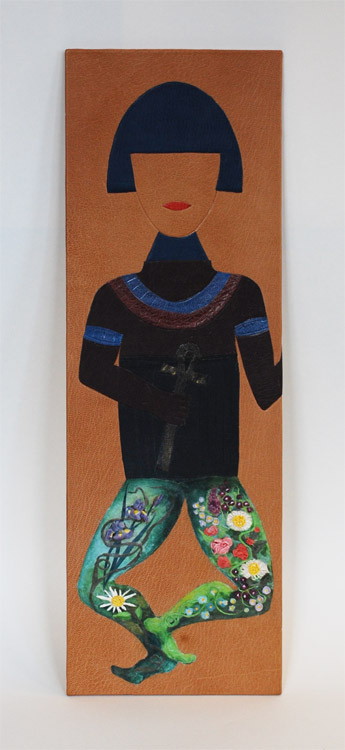
    MaryGraceEricPenelope-CorpseMary Grace Whalen
    Blue Pageboy, a leather tool-edged onlay made of goatskin is inspired by the Russian pioneer of geometric abstraction, Kazimir Malevich’s costume design and his Yellow Man painting. Blue Pageboy gives off a theatrical and mysterious vibe. Who is s/he? Only the body will tell!


    Eric Alstrom
    Okemos, MI

    After many ideas, I kept coming back to the idea of ancient Egypt and their exquisite corpses.  My design is based on various historic paintings, but did not copy any single on in particular. The design is made from various colors of goat painted with acrylics and blind tooled


    Penelope Hall
    Kingfield, ME

    Inlay consisting of glazed earthenware, scraps of Thai papers, and wheat paste. Colored with watercolor. Additional adhesives used are E-6000, and Jade 403 PVA. Finish coat on the inlay is SC 6000 acrylic polymer and wax emulsion.

    Nicole Campana – Jan Baker – Colin Urbina

    NicoleJanColin-Corpse

    Nicole Campana
    This design was inspired by nothing more than a common theme in much of my art: day and night. I’m drawn to the color palette each time presents and the way in which our perceptions of those colors change as the light does. The techniques utilized are predominantly onlays and gold tooling, however a variation of the lacunose technique and an Ascona tool were used for the hair.


    Jan Baker
    Providence, RI

    what i lost this year:
    – my ovaries
    – my fallopian tubes
    – my uterus
    – all of my hair
    – and my brother


    Colin Urbina
    Boston, MA

    When I’m sketching, I often come back to the roots of a plant. For this project I decided to attempt the same type of free flowing, loose, many-from-one nature of these sketches with traditional gouges. Using five or six tools I built up the legs of this plaquette, and then added acrylic paint into them that gets darker as the roots go lower. The dirt is represented by grain manipulation with sandpaper, changing the surface of the leather and giving it a different look and feel.

    Peggy Boston – John Nove – Shannon Kerner

    PeggyJohnShannon-Corpse

    Peggy Boston
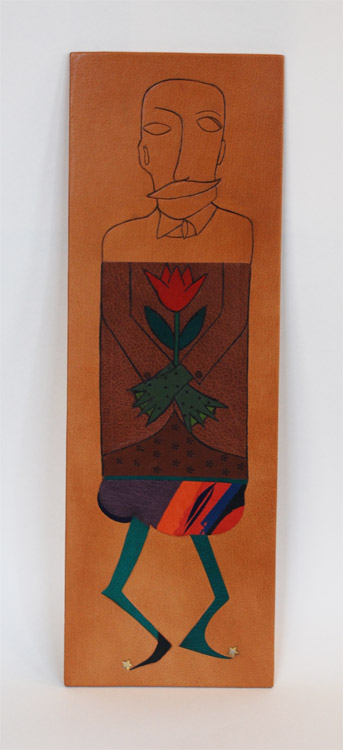
    My inspiration for this project came from a group of mustachioed, high-collared, quirky members of the Viennese Secessionist art movement. This movement was part of the golden age of illustration and graphic design in Vienna and Germany from 1897 to 1918. Their main influences were derived from William Morris and the English Arts and Crafts movement which sought to bridge the applied and fine arts. The Secessionists favored hand-made object opposing machine techniques. Hand tooling and acrylic paint.


    John Nove
    South Deerfield, MA

    The initial description of the project attributed the Exquisite Corpse to the Surrealists. My concept was of a Magritte-ian gentleman – fine suit, hands crossed in the standard coffin pose holding the usual flower  — but then with an amphibian’s green gnarly ‘hands’. Carbon tooling and goatskin onlays.


    Shannon Kerner
    Easthampton MA

    The vivid colors on the chubby tum were used to inspire whimsy, as well as the funny shape of the legs, which took inspiration from the cartoon Invader Zim, a silly plot animation focusing on an alien sent to Earth and meant to blend in. Stars: gold and palladium mixed together is a challenging medium to tool as they are different weights, but the outcome is very rewarding and attractive. Leather onlays, gold and palladium tooling.

    Todd Davis – Jason Patrician – Jacqueline Scott

    ToddJasonJackie

    Todd Davis
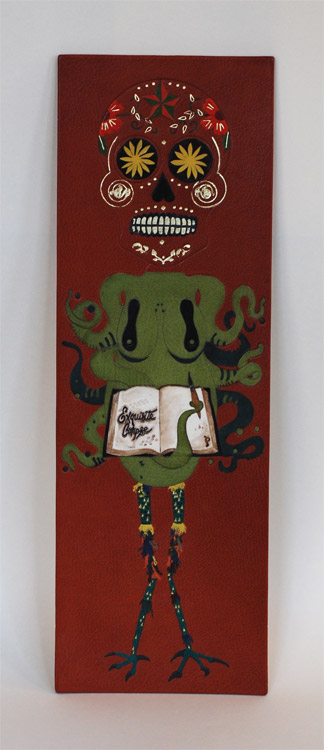
    The design of this head is inspired by the sugar skulls used as part of the Mexican celebration of Dia de los Muertos (day of the dead). On that day, these skulls, made of sugar, are part of an altar made to honor and celebrate dead ancestors, particularly children. Blind tooled outline filled with raised, ascona, and back-pared onlays. It is finished with blind and lemon gold tooling, and surface gilded teeth.


    Jason Patrician
    New London, CT

    I wanted to stay true to the surrealist exercise of the exquisite corpse by combining the distorted human figure and nature. For my design I chose the octopus, the master of disguise, which doubles as the female torso. Leather onlays (Harmatan and Pergamena), vellum inlay (Pergamena) with walnut ink wash and Prismacolor marker detail, blind tooling throughout.


    Jacqueline Scott
    Somerville, MA
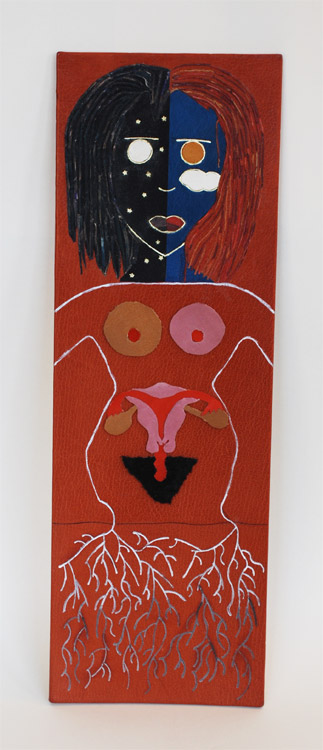
    Materials: goatskin leather, gold leaf
    Concept: I wanted my plaquette section to be whimsical and colorful and wanted to utilize the feathered onlay technique. Something about chicken legs appealed to me, so I ran with that, though I think they ended up looking more like reptile legs with funny leg warmers.

  2. Best of 2015

    December 31, 2015 by Erin Fletcher

    Wow, this has been a busy, busy year and I can’t believe that 2015 is coming to end. I want to extend my gratitude to the people who have helped contribute to the blog this year:

    Interviews:
    – Kathy Abbott
    – Ben Elbel
    – Tini Miura
    – Tracey Rowledge
    – Natalie Stopka
    Conservation Conversations Contributors:
    – Marianna Brotherton
    – Henry Hébert
    – Becky Koch
    – Athena Moore
    – Jacqueline Scott

    I also want to thank everyone who reads the blog, subscribes to the blog and newsletter and to those who’ve left comments. It has really warmed my heart to see the growth of interest and recognition that the blog has receive over the course of the year.

    At this time I like to reflect on my year. Herringbone Bindery saw a nice shift in workflow this year. As I removed conservation and repair services, I saw more edition work come my way. A few of these projects will be finishing up early in the new year and I plan to write up a post about them. I had another successful year teaching at North Bennet Street School with roughly 85% of my offered workshops running. I also began my second year as a Middle School Book Arts instructor. It’s been so delightful to see the creativity flow from the kids, stay tuned for a new feature on the blog.
    What to expect in the New Year:
    – an updated website: My husband and webmaster has been working on a beautiful new and easy to navigate website. We hope to have it up and running before the end of March.
    – I’ll be working on a fair amount of design bindings in 2016 and will be posting about them along the way
    – another round of interviews

    As I do every year, here is my list of favorite posts from 2015.

    bestof2015a

    1. December // Bookbinder of the Month: Kathy Abbott
    I am really delighted by this interview with Kathy Abbott. She is very methodical about her approach to design binding from selecting the perfect goatskin to applying her decorative techniques. Kathy’s discipline is inspiring and so are her simplistic designs.
    2. Artist: Rachel Foullon
    3. Client Work // Ye Sette of Odd Volumes

    bestof2015b

    4. Makin’ Care of Business Interview
    In July, I was interviewed by Rachel Binx at Makin’ Care of Business. It was a great way to reflect on my successes and how I’ve overcome challenges throughout the years I’ve been in business. I was honored to be apart of this collection of interviews with other talented craftsman and artisans working successfully as entrepreneurs.
    5. Artist: Nicholas Schutzenhofer
    6. North Bennet Street School // Student and Alumni Exhibit 2015 – Part One & Part Two
    I love writing this post every year. It’s a joy to speak with the students about their design bindings; detailing their concepts and techniques, what worked and what didn’t. This year’s exhibit also included a lovely selection of bindings from alumni, which you can read about in Part Two.

    bestof2015c

    7. Conservation Conversations // Making an Old Book Whole Again by Jacqueline Scott
    Jacqueline Scott had a slew of internships this past summer, which offered great material for the Conservation Conversations column on the blog. I particularly enjoyed this treatment of a binding in the collection at the Newberry Library in Chicago.
    8. March // Bookbinder of the Month: Tracey Rowledge
    I am so awed by the art work and bindings from Tracey Rowledge. Her responses to my interview questions were so thoughtful and inspiring. There is no mistake that she is a talented craftsperson with an impeccable ability to meld her artistic capabilities into her bindings.
    9. Artist: Tomma Abts

    bestof2015d

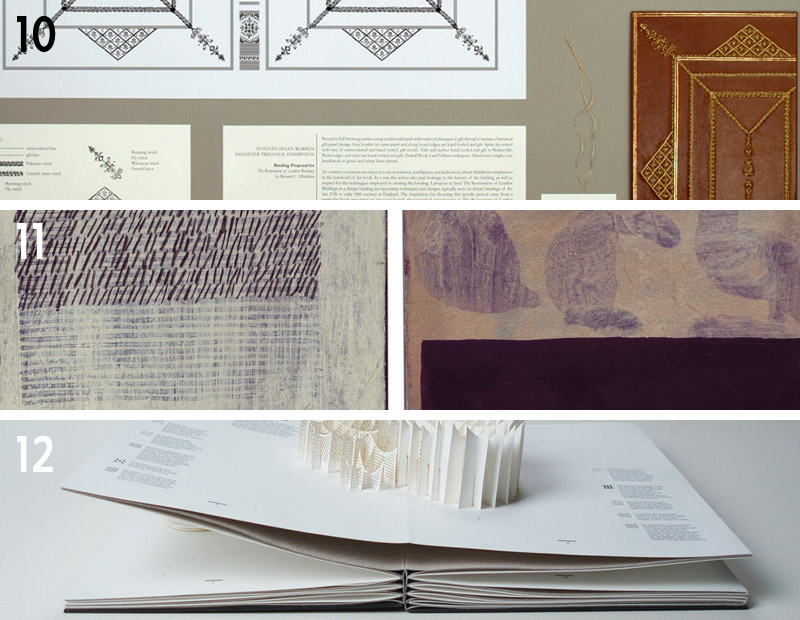
    10. Seventh Triennial Helen Warren DeGolyer Exhibition and Bookbinding Competition 2015
    As a first time participant in the DeGolyer Exhibit and Competition, I found the experience to be quite rewarding (despite the fact that I didn’t actually win anything). It forced me to execute an idea for a design binding in a new and more extensive way. This post goes into detail about my own proposal and the proposal from winner, Priscilla Spitler.
    11. Artist: David Quinn
    12. July // Bookbinder of the Month: Ben Elbel
    An innovator in the field, Ben Elbel has continuously churned out variations on structures and has developed several new styles of binding. I am always looking forward to his next project; to read about the challenges posed by the binding and the elegant solutions he comes up with.

    bestof2015e

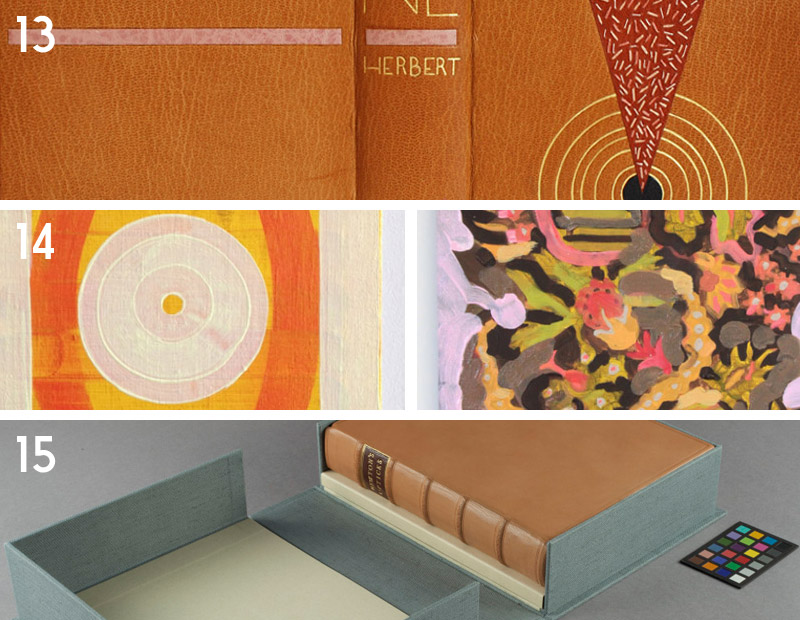
    13. My Hand // Dune
    This year I finished my design binding for Dune, that was then accepted into the Guild of Book Workers Traveling Exhibit: Vessel. I am very pleased with the outcome of this binding, particularly with the edge decoration and the successfully gilt concentric circles. No easy task.
    14. Artist: Lily Stockman
    15. Conservation Conversations // The Continuum by Henry Hébert
    Henry Hébert has been writing for the Conservation Conversations post for 2 years now and has continuously delivered interesting and sometime hilarious content. The outcome of Henry’s treatment shared in this post is stunning. The new binding is well executed and is treated with respect to the binding’s historical content.

    Happy New Year!


  3. Conservation Conversations // What drives treatment?

    December 22, 2015 by Jacqueline Scott

    One of the most important questions we need to ask ourselves as book conservators is how the object we are working on will be used. What is driving the need for treatment? Because there are often so many different treatment paths we can choose from for one object, this question not only helps us to narrow the path of treatment, but it also helps to make sure that we don’t over treat an object, altering something in a way that might be irrelevant to its ultimate use. If we aren’t asking this question before beginning, thoughtless and potentially harmful treatment is most likely to result.

    There are three reasons for treatment that I see most often: heavy reader use, exhibition, and digitization. Each presents unique challenges and treatment options . . .

    Heavy Reader Use:
    If a book is expected to see heavy use, the treatment focus is going to put on making the binding functional and able to withstand handling. Often times, this means rebacking the binding in cloth, leather, or tissue, and treating the pages so that they can be flipped through without crumbling to pieces. Circulating collections conservation labs see this work most often, performing rebacks as if they were as second nature as brushing ones teeth. Special collections conservation labs see this less frequently, but if a binding is special enough, it might require a full treatment: disbinding, washing and sizing, and either repairing the original binding or giving it something shiny and new. The treatment that I described in my previous post, where a loss was filled in the front cover of a wooden boards binding, was done because the volume was expected to see use and having a complete front cover would prevent a significant amount of damage to occur in its handling.

    1


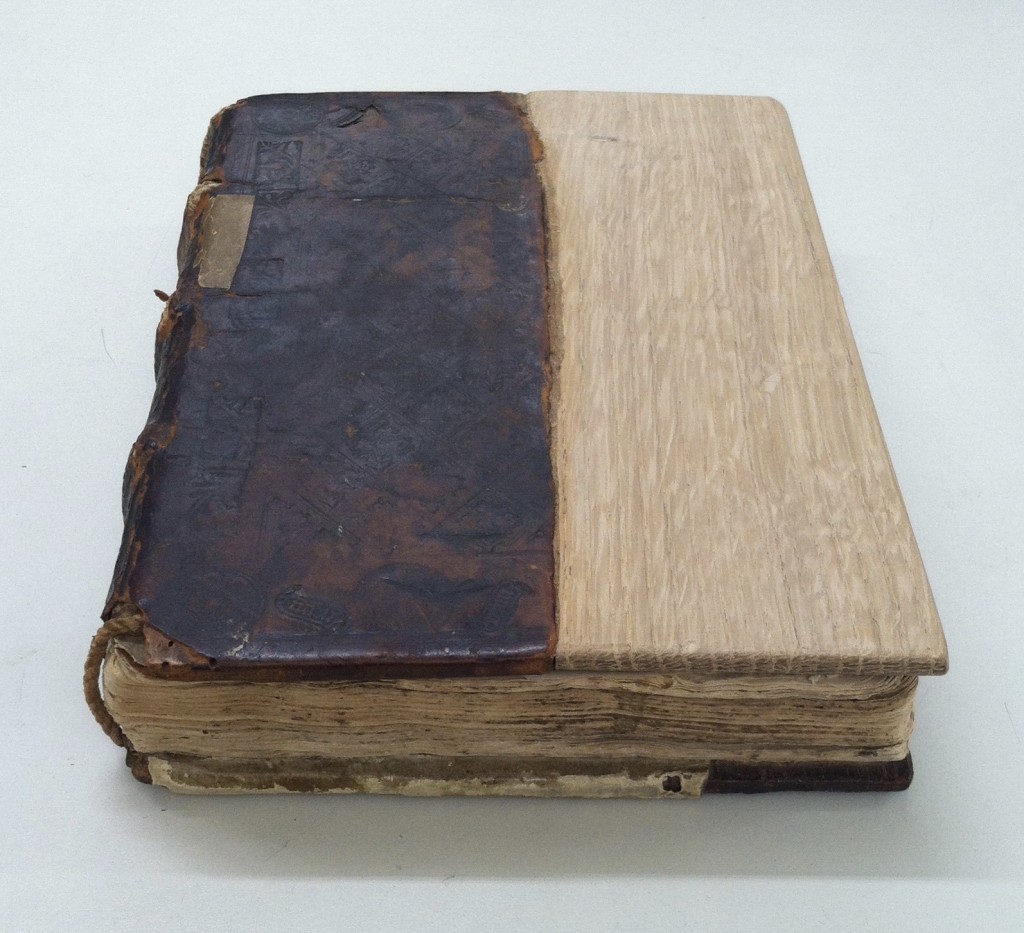
    The binding to the left was rare, and as a result likely to be requested by researchers. The above image was before treatment, and any handling would clearly be difficult as the binding had essentially been lost, save for the covers. The volume was treated by washing and sizing the pages, making them softer and easier to handle, mending and guarding, and putting the text into a limp paper case, which opens easily and protects the pages within.

    Exhibition:
    When a book is slated to go into exhibition, this typically means that it is going to sit in a case, opened to one angle for at least a couple of weeks. In this case, it is not so much necessary to treat the entire binding as it is to make sure that the binding will be stable when it is on display. Making sure that the binding doesn’t open past where it is comfortable by fitting a cradle to it is paramount. Treating the pages that it will be opened to, for handling and aesthetic purposes, is also important. There are some great photos here from the Folger Shakespeare Library’s 2015 three-day symposium on book cradles for exhibition.

    Digitization:
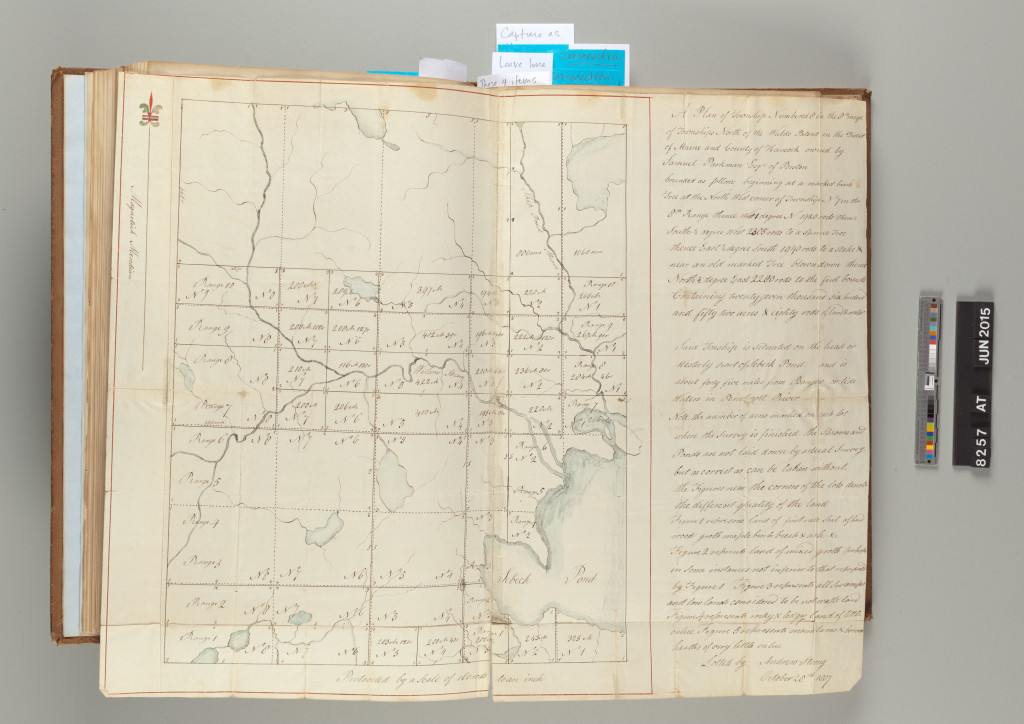
    In the short time I’ve spent working in this field, digitization has quickly emerged as the most common reason for treating a volume. Initially, I saw digitization as something that might eventually make conservation work unnecessary. Often the work that is done on an object slated for digitization is quick, with the goal of stabilizing the volume so that it can be handled by the photographer. If something is being put online, presumably where most people will access it, why spend time and money conserving the actual object? However, I hope that digital access will instead serve to peak interest in physical books, resulting in a need to spend more time conserving the bindings so that they can be used. Increased availability of collections will hopefully result in more people being aware of the books that are available to researchers, and after finding them online will want to see them in person. Because digitization is such a new component to conservation, only time will tell how it will affect treatment decision-making.

    8257-AT-02

    This book was being digitized, and so I used re-moistenable tissue for quick, in-situ repairs of these map folds.

    IMG_3465

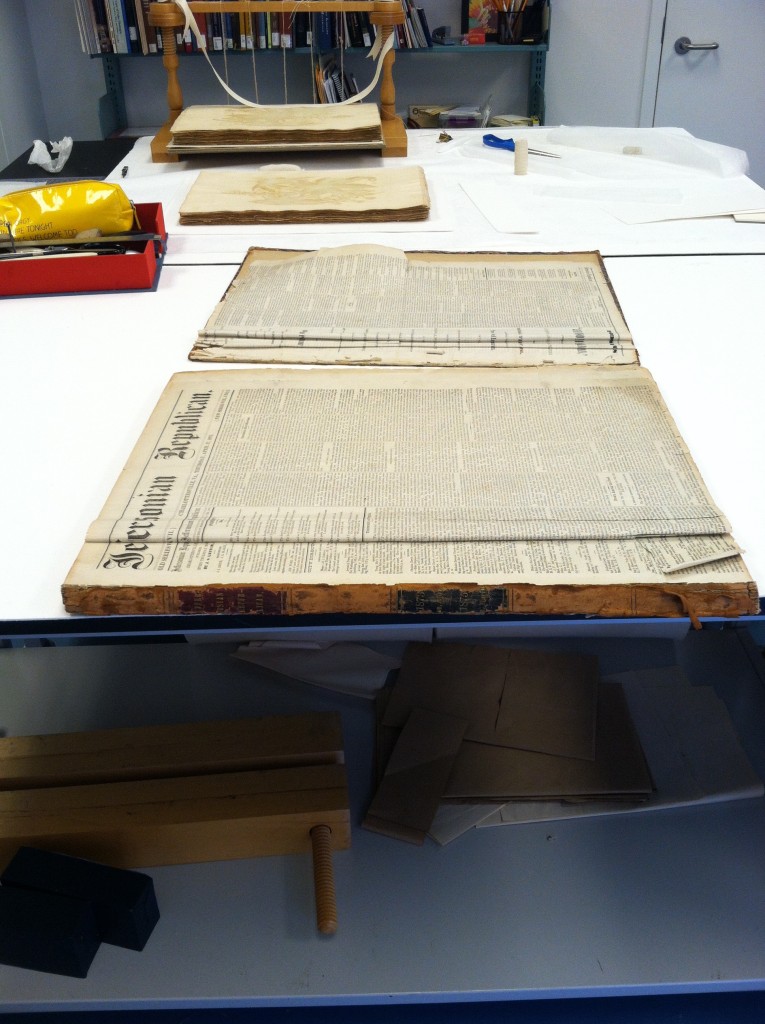
    Imaging was also the goal of this bound volume of 19th century newspapers. The papers were disbound and mended, so that they could be imaged flat, and never rebound.


  4. Conservation Conversations // Making an Old Book Whole Again

    December 3, 2015 by Jacqueline Scott

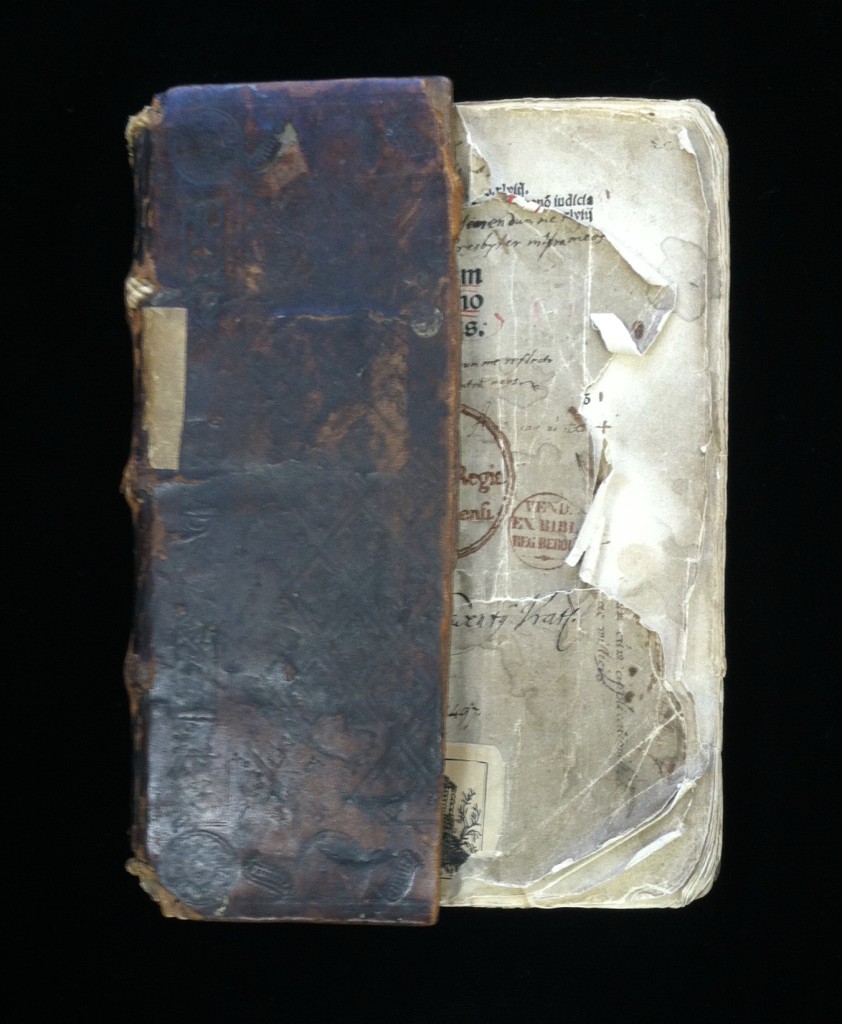
    Before Treatment – front cover

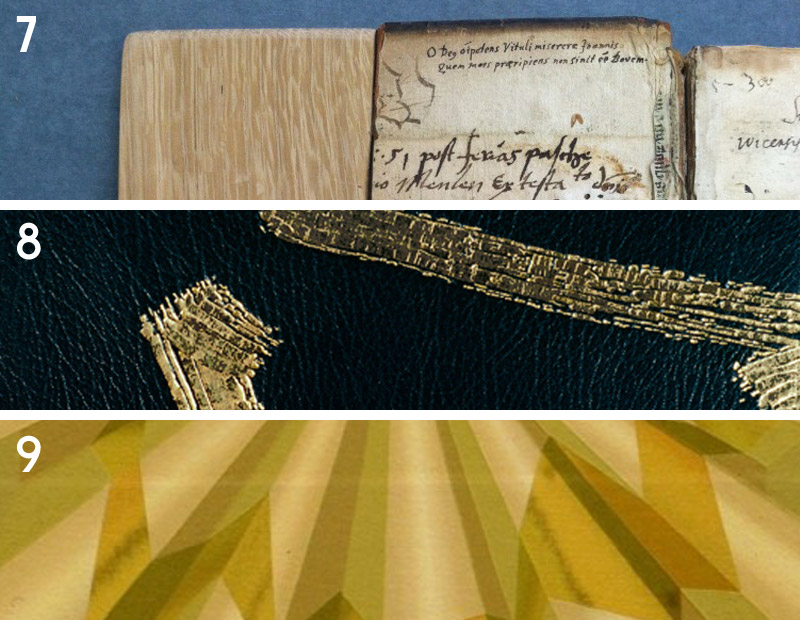
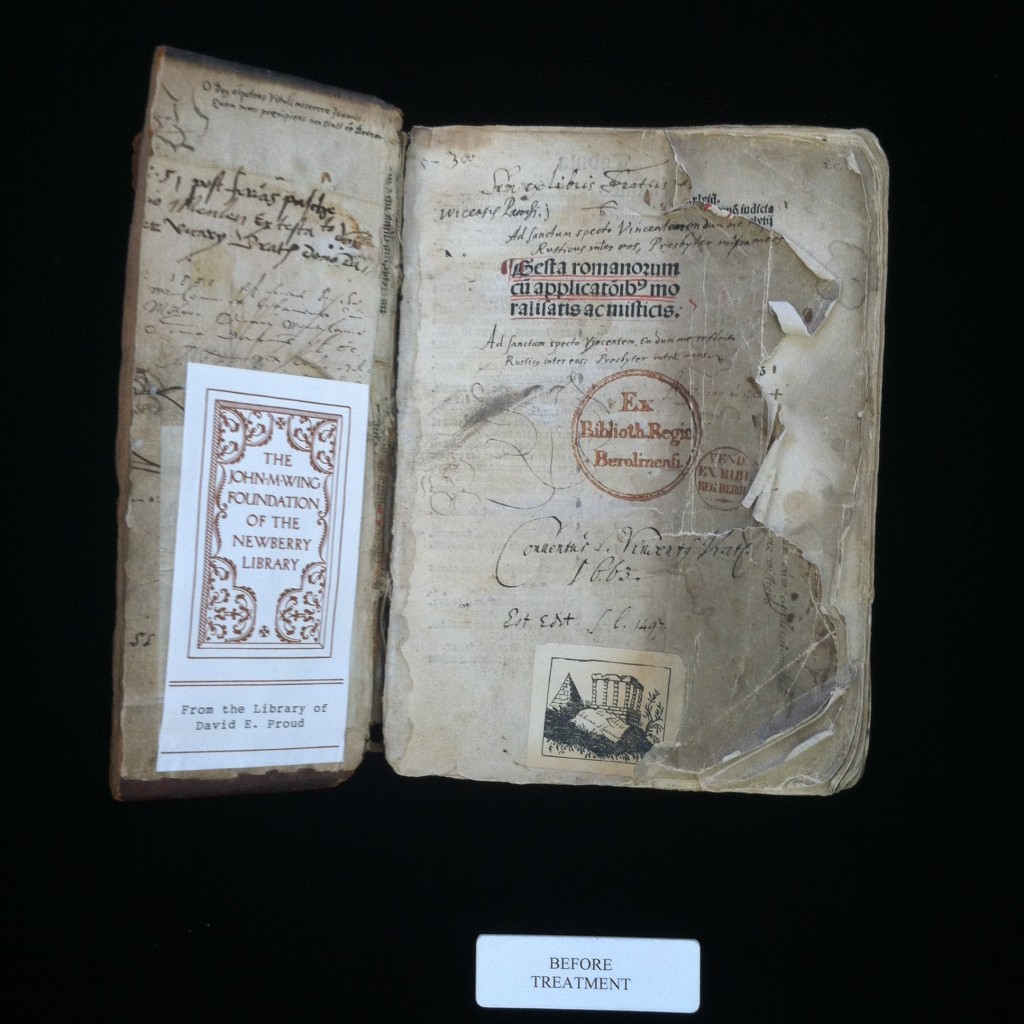
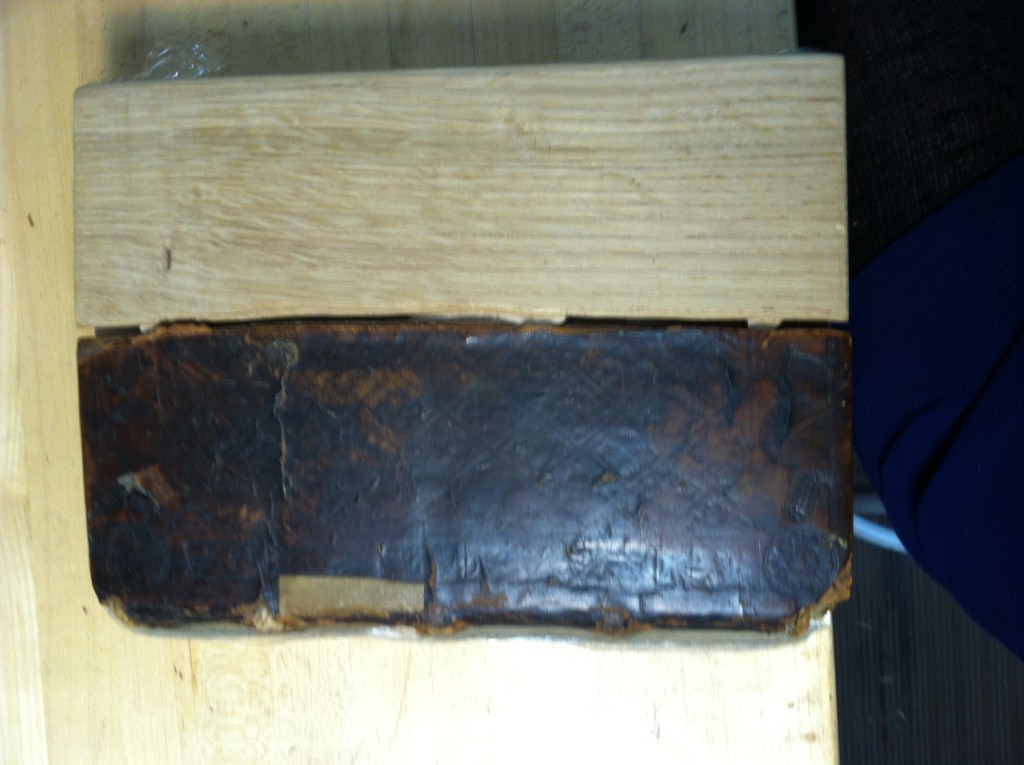
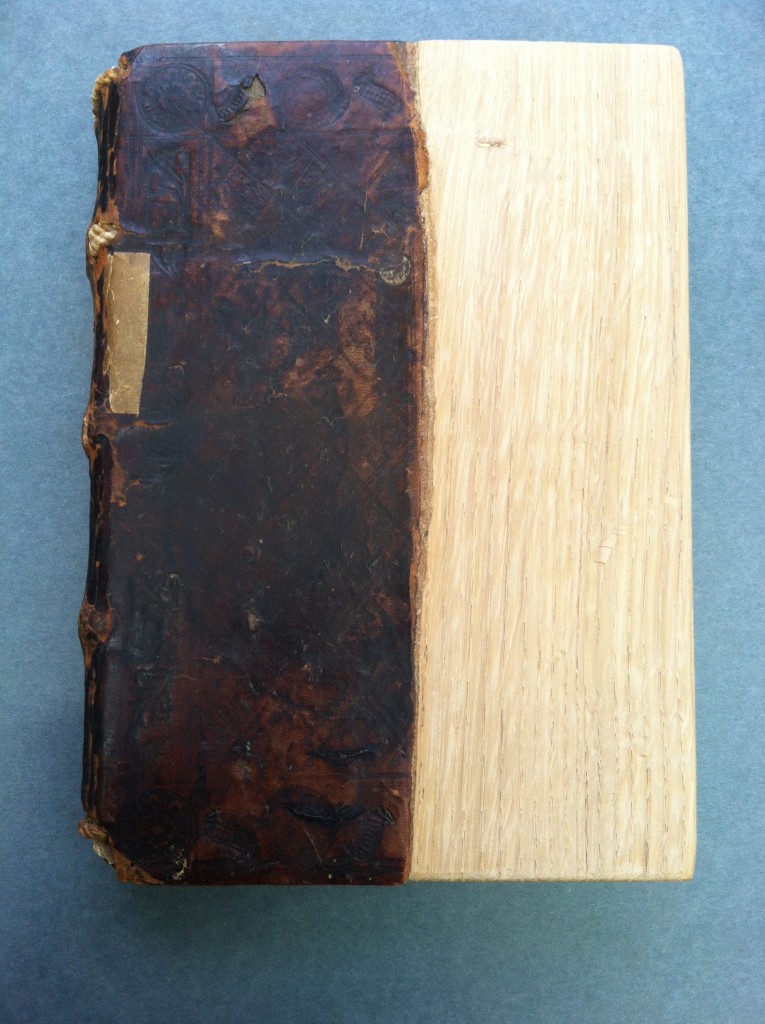
    While I was a book conservation intern at the Newberry Library this past fall, I had the opportunity to treat an incunabula in a wooden boards binding. The binding, while quirky with old DIY repairs, was structurally sound, and most of the pages were in good condition. The primary problem needing to be treated was that the front board had split, half of it being lost along the way. As a result, part of  the text block was left exposed, torn and dirty. In order to prevent future damage to the text block, as well as to restore cosmetic integrity, we decided that the loss in the front board should be replaced and the damaged pages of the text block mended. What seems at first glance to be a simple, mostly cosmetic repair in fact required a nuanced execution and was important to the binding’s stability. The volume was rare enough that the library could expect it to see significant use, so having a complete front board was important to help protect the text from future damage.

    Before Treatment – Inside front cover

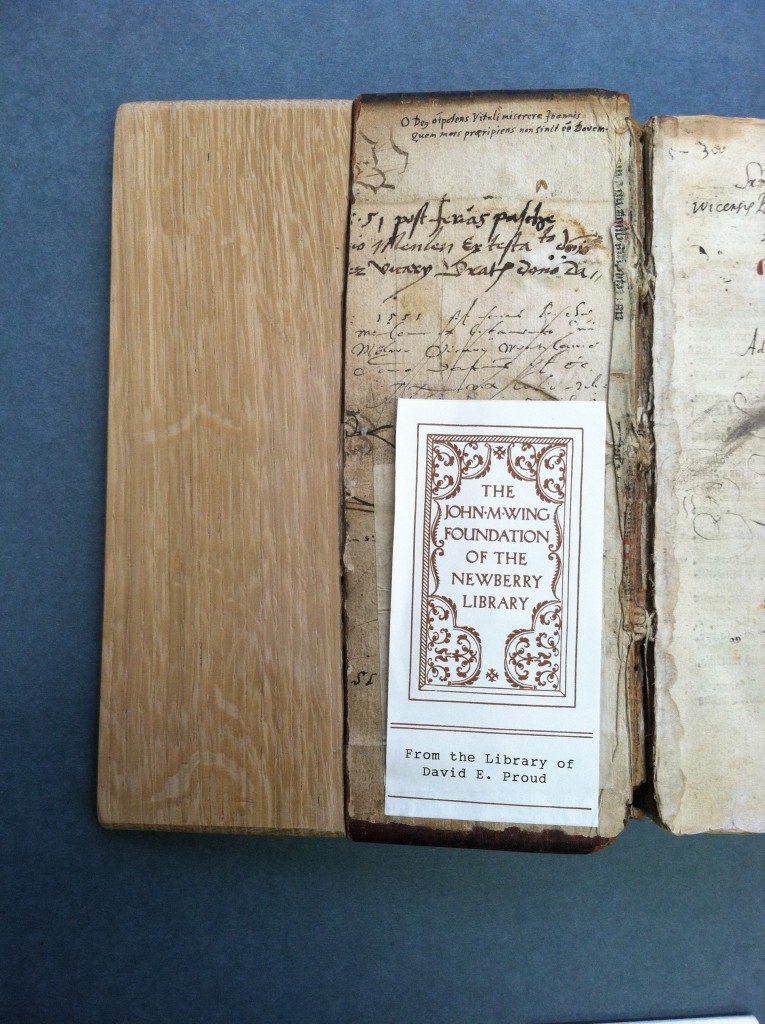
    The first step I took in treating the volume was to surface clean and mend the first three pages of the text block. It appeared that the half of the front board must have been missing for a big part of the book’s life, because the pages were highly discolored and torn only in the exposed area.

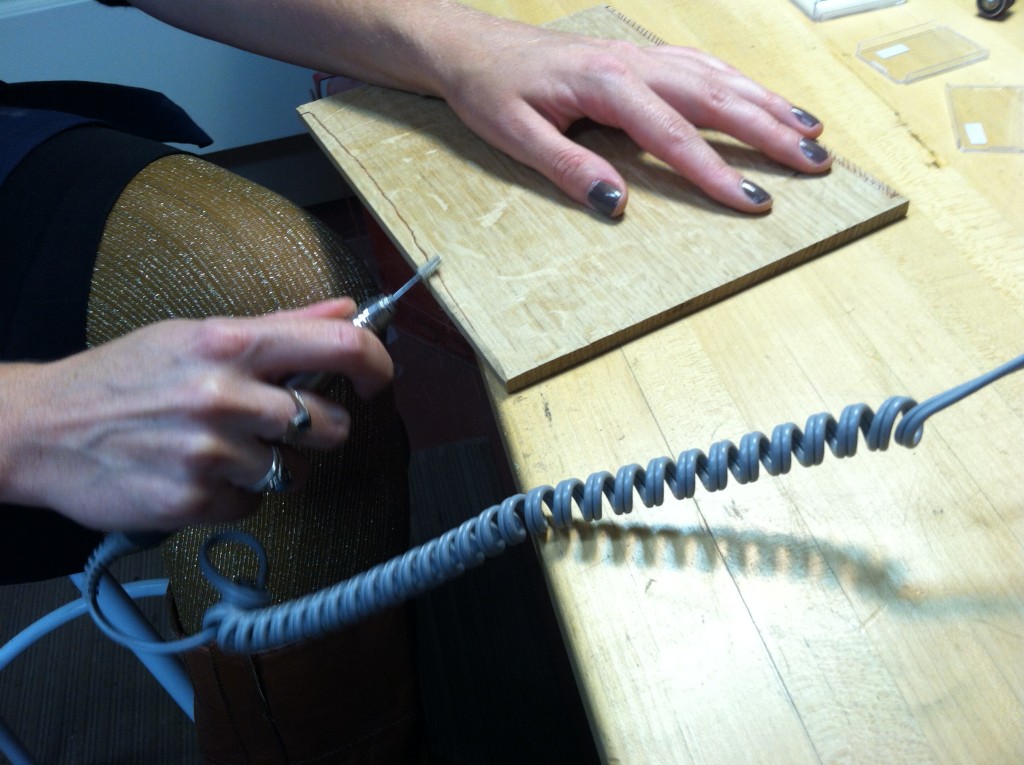
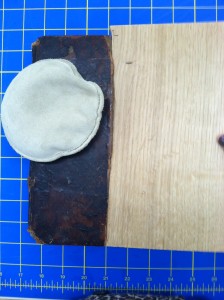
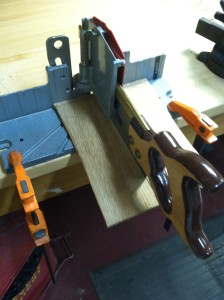
    The next step was to trace the general shape of the loss onto a new piece of wood. Because the board split in an uneven way, resulting in variations not only across the board but thickness-wise, fitting the new board to the old was a finicky process. I used a tracing profile gauge (a tool typically used to trace the shape of crown molding) to transfer the contours of the broken board onto the new. I then used a dremel with various attachments to very slowly fit the new board to the old. This process took about three days of trial and error, slowly removing more and more material until the fit was more or less right.

    During Treatment – using a dremel to shape filler board

    IMG_3919

    During Treatment – checking fit of filler board

    During Treatment – cutting filler board to proper length

    The old board had some slight shaping to it, so before fitting the two boards together, I had to shape the edges of the new board to transition seamlessly to the old. I did this by lightly sanding with a sanding block.

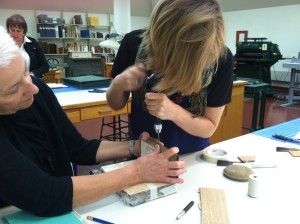
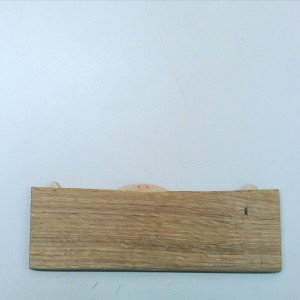
    To attach the new board to the old, I used wooden biscuits inserted into slots made in each board. The biscuits we had on hand were a tad too thick for the boards, so I sanded them down to a proper thickness. I then used a drill to make starter holes in each board and finessed the holes with the dremel until the biscuits fit snuggly. I first inserted the biscuits into the filler board using PVA and then made slots in the original board that they would fit into.


    IMG_3940

    During Treatment – using a drill to start the slots in the original board

    During Treatment – filler board with biscuits inserted

    It took a couple of tries to get the slots in the original board deep and wide enough so that the filler board would sit flush.

    During Treatment – checking the fit of the biscuit slots, still had a ways to go

    During Treatment – the PVA/wood shaving filler mix

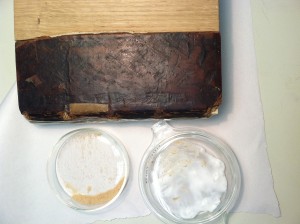
    After the two pieces of board were joined together, there was still a small gap between them. While I wanted it to be apparent that new material had been added to the cover, I still wanted the transition from the original board to the fill to be as smooth as possible. I decided to fill the gap from the front with a mixture of PVA and wood shavings. The PVA dried clear, resulting in a fill that matched the new wood perfectly. I used the dremel to produce the wood shavings, because I found that if I used sandpaper, bits of black sandpaper grit found their way into the shavings, resulting in a dirty-looking fill. I decided to leave the inside of the board unfilled because it left the biscuits slightly visible, allowing a future conservator or researcher easy access to the history of the binding’s repairs. The new board was left uncovered for the same reason.

    The result of the treatment was incredibly satisfying to see and hold. The book felt much more comfortable, resting between two complete boards, and I feel confident that the treatment will keep it safe and accessible for future researchers.

    After Treatment – front board

    After Treatment – inside front board

    After Treatment


  5. North Bennet Street School // Student & Alumni Exhibit 2015 – Part Two

    May 28, 2015 by Erin Fletcher

    In addition to the set books I wrote about in Part One of this post, the Student and Alumni Exhibit at North Bennet Street School includes a selection of bindings produced by current students and alumni of the full-time program. In this post, I’ll be highlighting some of my favorites.

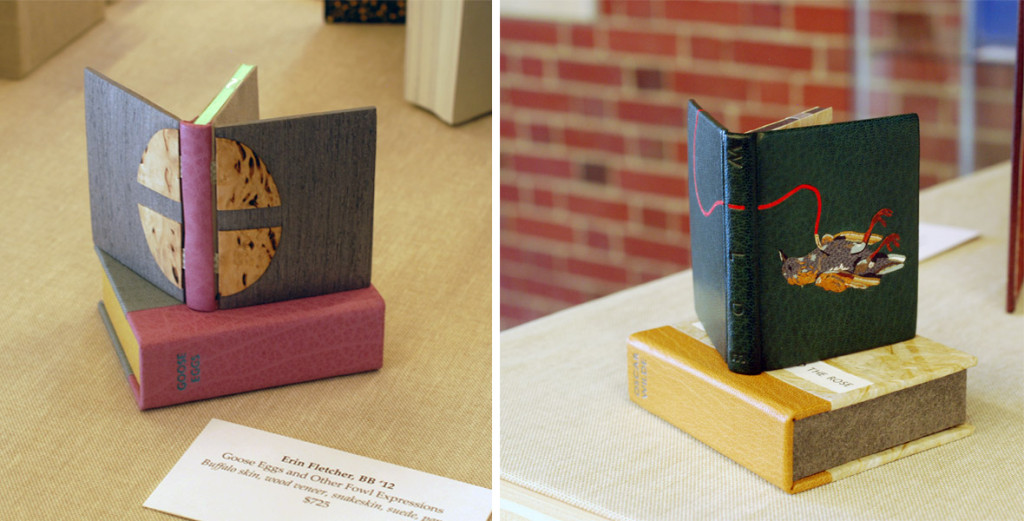
    I’ll start with my own bindings. This year I submitted two miniature bindings, which I’ve completed within the last 8 months. The book on the left is Goose Eggs & Other Fowl Expressions bound in the Dorfner-style with wood veneer boards. I wrote about the process a few months ago, you can check that out here.

    The second binding is The Nightingale and the Rose by Oscar Wilde. The book is bound as a traditional French-style fine binding. The nightingale on the front board is created using various back-pared onlays, feathered onlays and embroidery. For those of you who know the story, there is also a small wood veneer inlay that represents the rose’s thorn. The binding includes tan goatskin doublures. The back doublure showcases the rose and was created in the same manner as the nightingale.

    ErinFletcher-NBSSExhibit

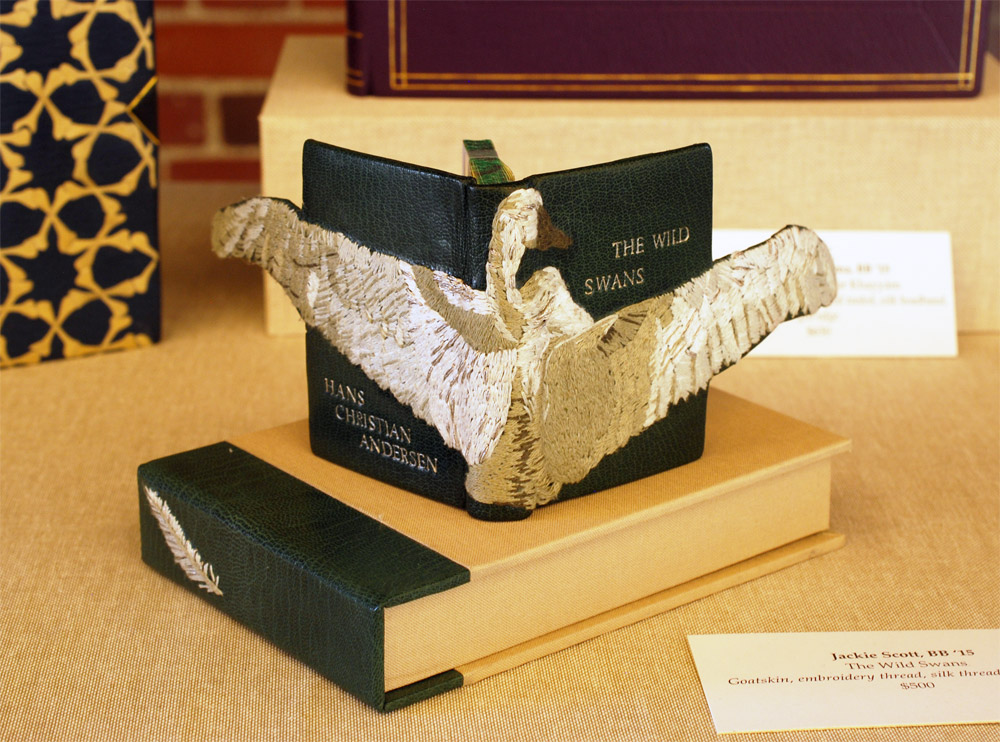
    Next up is Jacqueline Scott’s embroidered binding of Hans Christian Andersen’s The Wild Swans. Jacqueline is apart of the 2015 graduating class and I featured her set book in the first post. Her work is so stellar and I had the delightful opportunity to see this book as it took a journey to became this very gorgeous binding.

    The embroidery is so delicately handled and the feather embroidered on the spine of the box adds just the perfect amount of intrigue. The swan’s wings extend beyond the fore edge and are covered on the backside with matching green goatskin leather. I can’t wait to see how Jacqueline continues to explore embroidery in her work.

    JaquelineScott-NBSSExhibit

    The rest of the images were taken after the exhibit was fully installed, so please pardon any glares, shadows or my reflection. I would also like to note that I had intended to include the work of Rebecca Koch and Anne McLain, but it was rather difficult to capture an accurate photograph of their bindings due to reflection and glare issues. So sorry you two but I would like to say that loved your bindings!

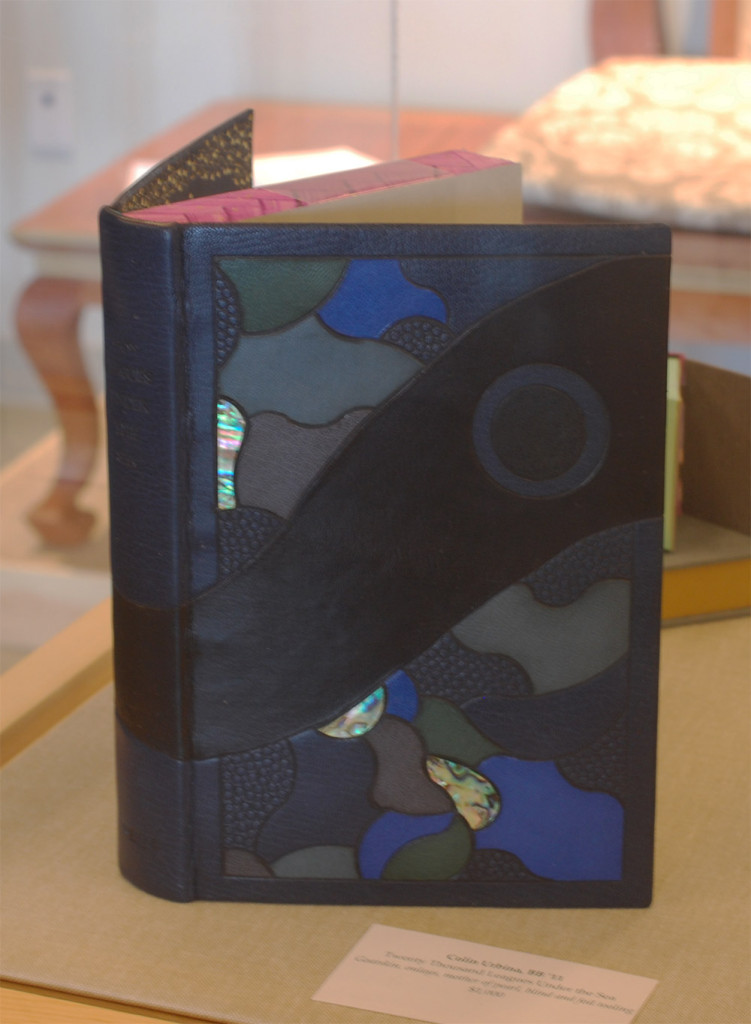
    The following binding was recently bound by my charming bindery mate Colin Urbina, 2011. In his binding of Twenty Thousand Leagues Under the Sea by Jules Verne, he created an abstract underwater scene with several tooled leather onlays and inlays of pearl. Other portions of the design are texturized with an open circle tool and by pressing sandpaper into the wet leather. The title and author are blind tooled on the spine.

    The head edge is painted in a vibrant purple with brushstrokes that cross over one another. Colin put in matching edge-to-edge doublures and added a frame of ascending “bubbles” using the same open circle tool.

    ColinUrbina-NBSSExhibit

    GabrielleCooksey-NBSSExhibit

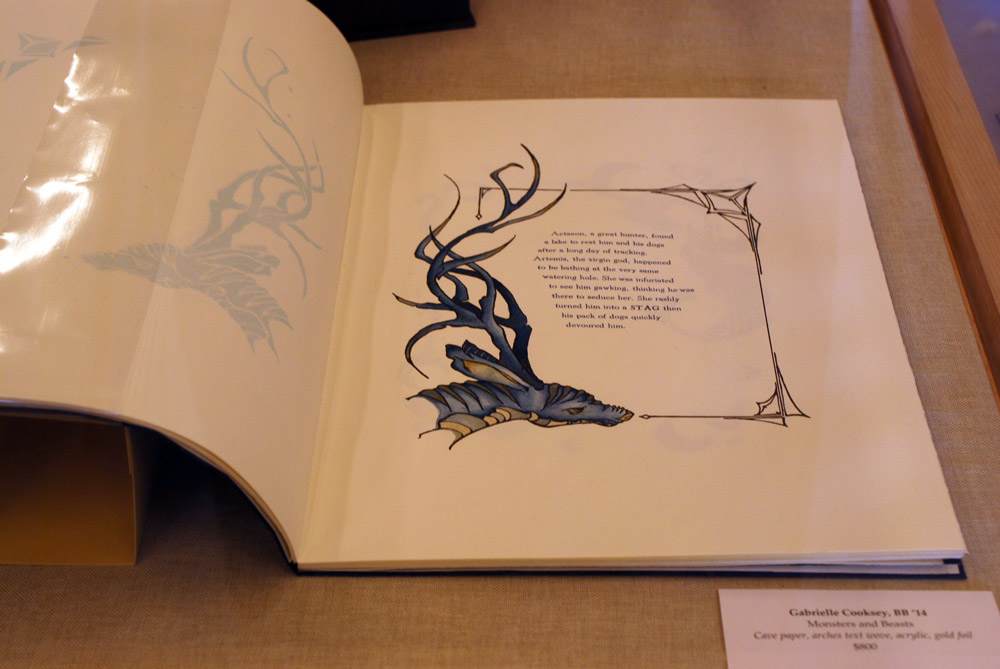
    Monsters and Beasts is the work of the incredibly talented Gabrielle Cooksey, 2014. Unfortunately, I don’t know much about this piece. But I believe that everything from the illustrations to the printing were all done by Gabrielle. It’s absolutely beautiful work!

    KaitlinBarber-NBSSExhibit

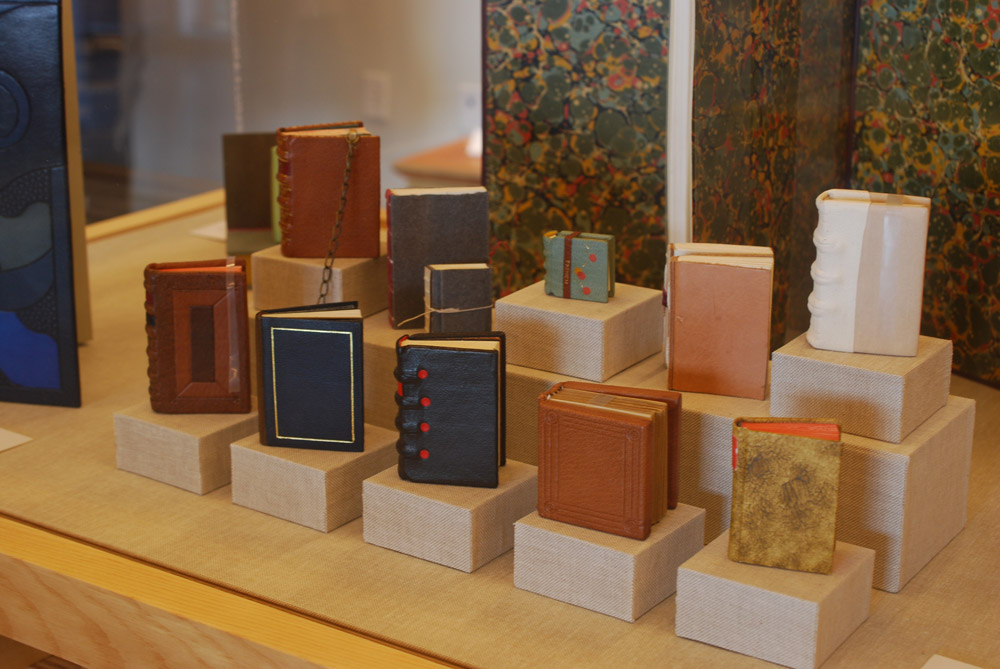
    Kaitlin Barber is the master of miniatures (and there always seems to be one in every class). In this adorable and wildly impressive collection of bindings, Kaitlin has miniaturized a selection of historical bindings she learned over the course of her time at North Bennet Street School. She’ll be apart of the 2015 graduating class and I wrote more about her work in the first post.

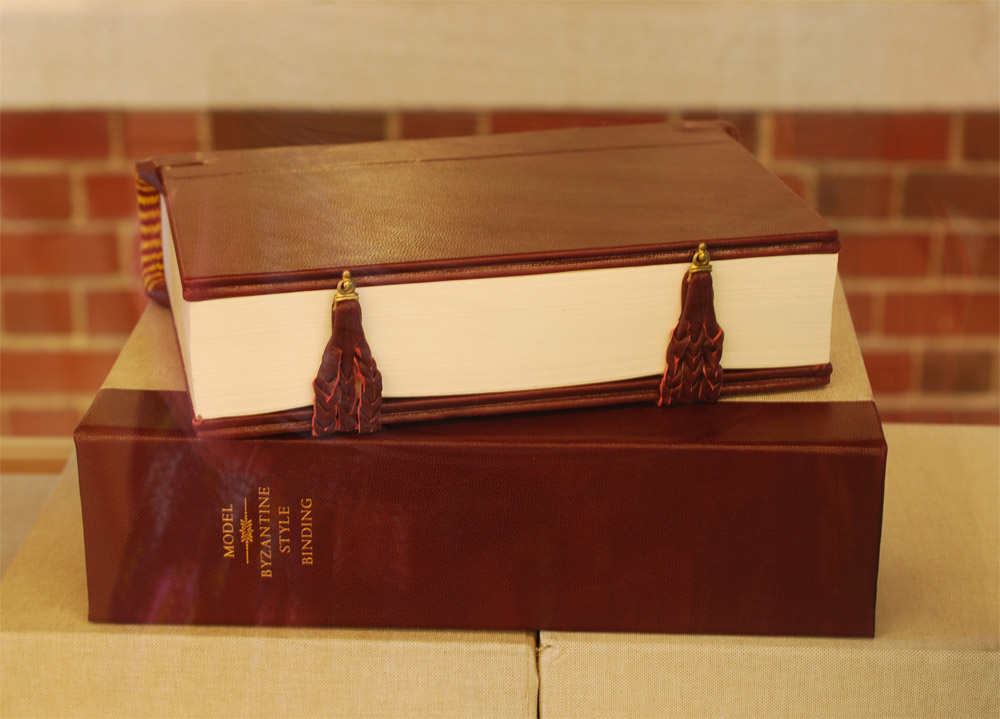
    Continuing on with the topic of historical structures, the students were treated to a week long workshop in the spring with Dr. Georgios Boudalis. Using his extensive understanding of Byzantine culture, he taught the students none other than a traditional 12th century Byzantine structure. Todd Davis, 2016, included his binding in the exhibit. The bindings are quite massive and required a lot of detailed work, such as board shaping, primary and secondary headbands, braided straps and clasps. After all that blood, sweat and tears, the class bound some really lovely models.

    ToddDavis-NBSSExhibit

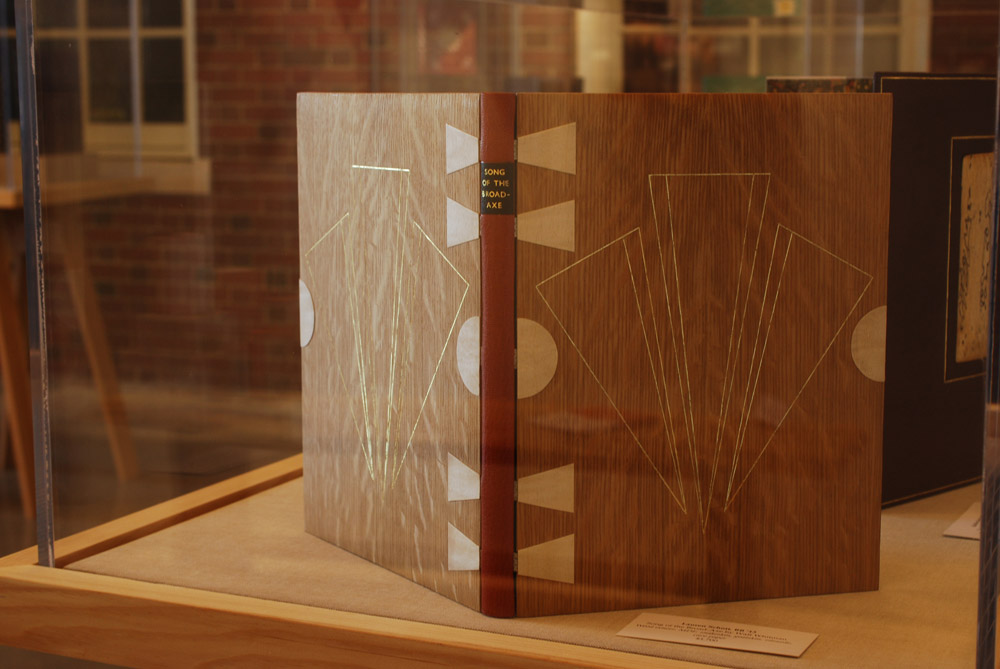
    The next binding on my list of favorites was done by another studio mate of mine, Lauren Schott, 2013. Bound in the Dorfner-style (same as Goose Eggs) with wood veneer boards and a leather spine. Lauren’s design on this binding of Walt Whitman’s Song of the Broad-Axe is so elegant.

    Lauren and I are both a big fan of incorporating shapes and symmetry into our designs. The front and back board are gold tooled onto the wood veneer; the tooling sits in the veneer so that at certain angles becomes almost invisible.

    LaurenSchott-NBSSExhibit

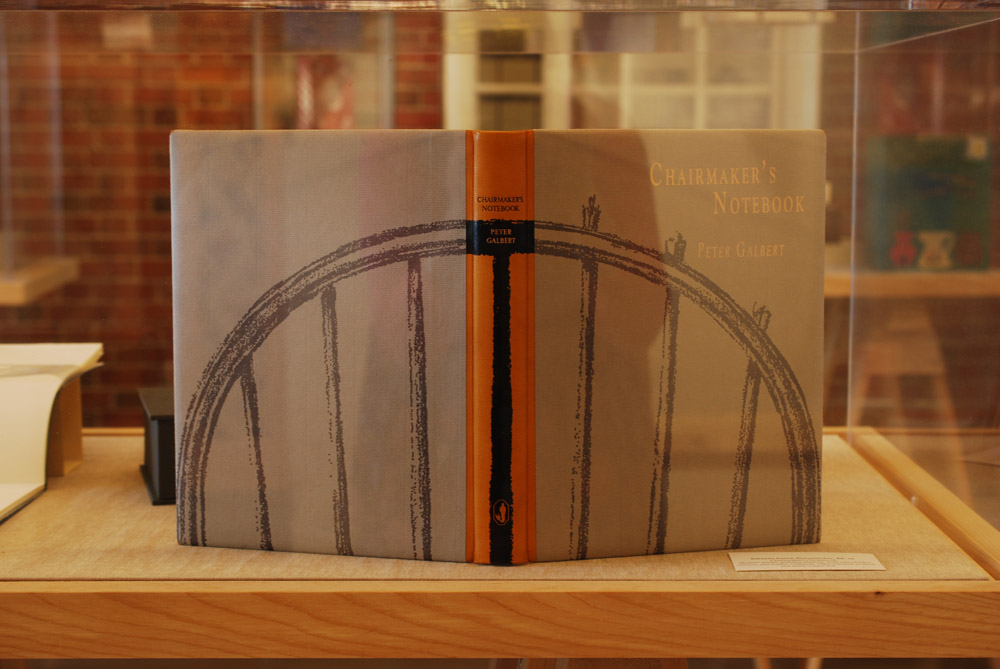
    And to round out the favorites is this stunning binding from Johanna Smick Weizenecker, 2010. This binding of Chairmaker’s Notebook is a quarter leather goatskin binding with semi-hidden corners. The design on the front and back cover continues onto the spine as an onlay. The title and author are hand titled using black and copper foils.

    JohannaSmickWeizenecker-NBSSExhibit

    So that concludes this year’s Student and Alumni exhibit at the North Bennet Street School. I hope you enjoyed this overview and I want to thank all of you who were able came out to see the show in person!


  6. North Bennet Street School // Student & Alumni Exhibit 2015 – Part One

    May 20, 2015 by Erin Fletcher

    It’s graduation season, which means it’s time for this year’s post on the North Bennet Street School’s Student and Alumni Show. (You can read the past two years here and here). This is an event that I always look forward to. The graduating students are each given a copy of the same book (a set book) and asked to create a design fine binding. The amount of creativity and talent that goes into each binding really displays each student’s personality. The exhibit is currently on view at the North Bennet Street School in Boston, Massachusetts until May 29th. If you are around, please pay a visit to see these bindings up close.

    The set book for this year’s graduating class is the The Rubáiyát of Omar Khayyám. It’s a beautifully illustrated book printed in a rather large format, which is something many of the students discussed with me. After photographing each book*, I had a discussion with each binder. We talked about the inspiration behind their designs, their thoughts on the binding process and what challenges they faced.

    * I want to note that the photographs were taken in various spaces at the school under not ideal lighting. So you may see variation in color for some of the bindings.

    Kaitlin Barber

    Rubaiyat-KaitlinBarber

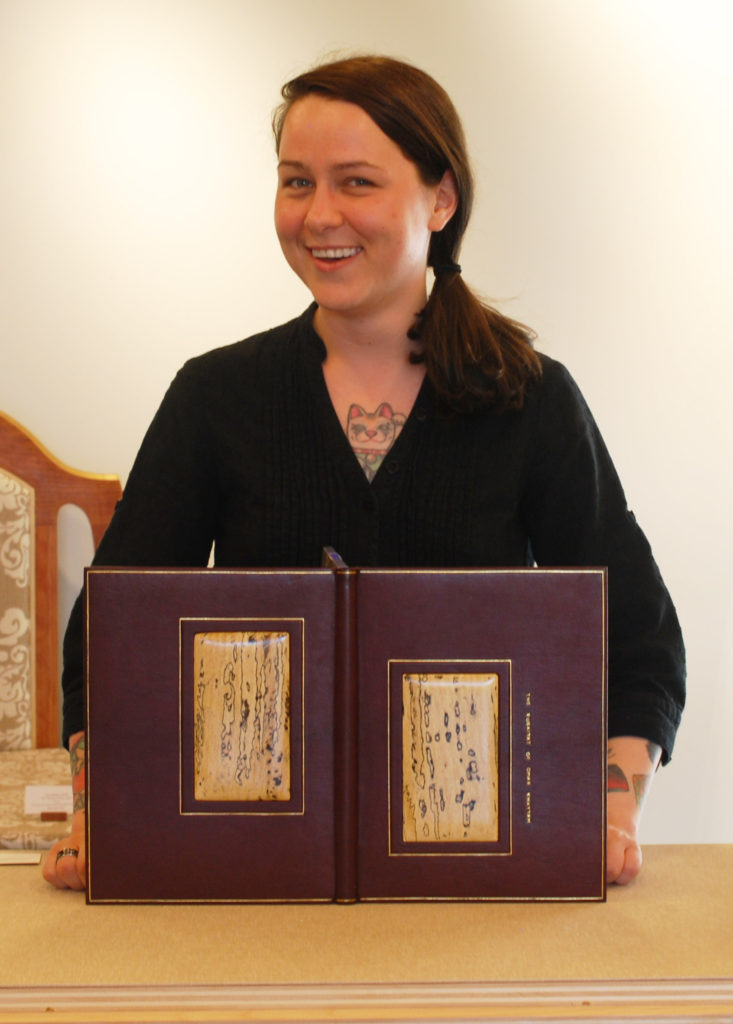
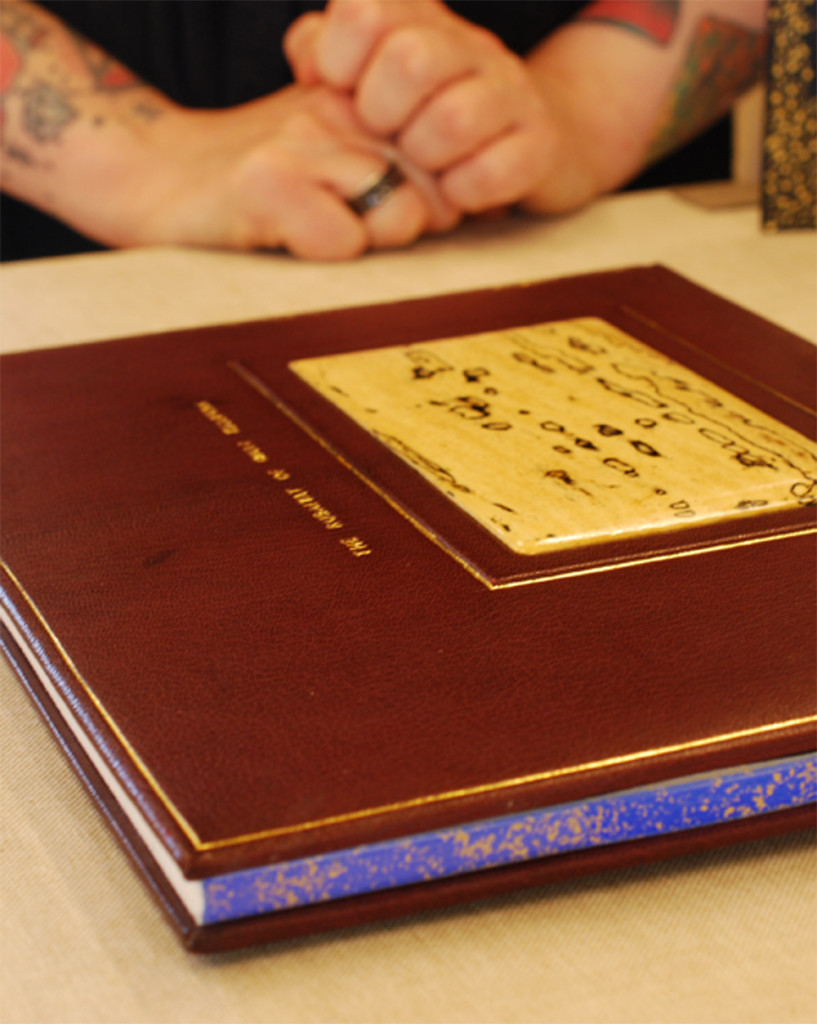
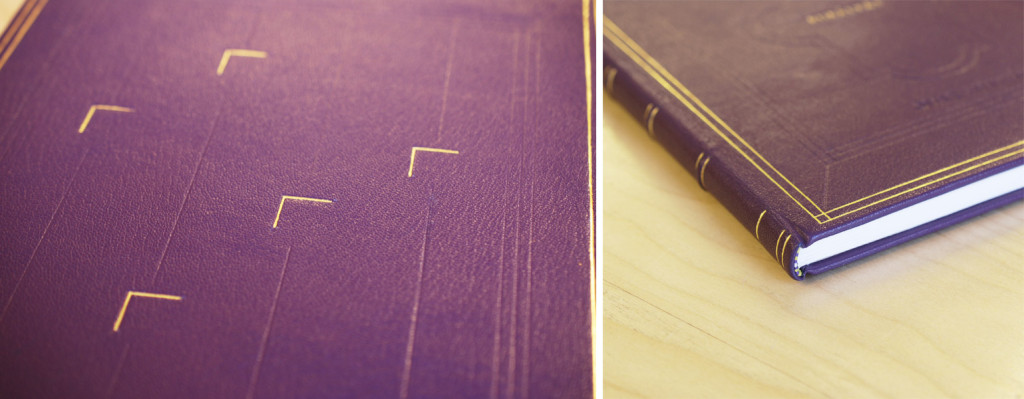
    Kaitlin Barber‘s approach to her design stems from her admiration of 18th century tooled panel and Cambridge panel patterns. Though in her design, she reinterpreted this look in a sleek and modern way. The binding is covered in a maroon goatskin with a raised window framing two inset panels of spalted tamarind. Kaitlin’s decision to use wood was inspired from an article by Helene Jolie and during a workshop taught by Jim Croft. In the article, Helene writes about the variety of materials one might employ as an inset panel, while Jim introduced shaping possibilities during his workshop.

    I think Kaitlin’s use of the spalted tamarind is genius, not only is it really beautiful and is elegantly shaped, but it also acts as symbolism for the message of life and death peppered throughout the book’s text. The dark abstract shapes in the spalted wood occurs when fungus enters the tree often causing it to die.

    Rubaiyat3-KaitlinBarber

    Gold tooled borders highlight the spalted tamarind as well as frame the entire the book. The title is tooled alongside the front panel. The head edge is airbrush with a brilliant blue acrylic, then sprinkled using gold leaf. The French double core headbands are sewn with silk threads. Kaitlin used a marble paper as her paste down and flyleaves.

    One of the main challenges Kaitlin faced during the binding process was working with such a large format, specifically when it came to paring the leather. Due to its size the leather included many areas of the skin such as the arm pits and backbone. These parts of the skin will react differently when being pared; the arm pits are stretchy while the backbone is a bit tougher. In the end it was a really great learning experience for Kaitlin.

    After graduation Kaitlin will continue in her internship at the Boston Public Library’s Rare Book Room, which began in January and will run through the summer.

    Lauren Calcote

    Rubaiyat-LaurenCalcote

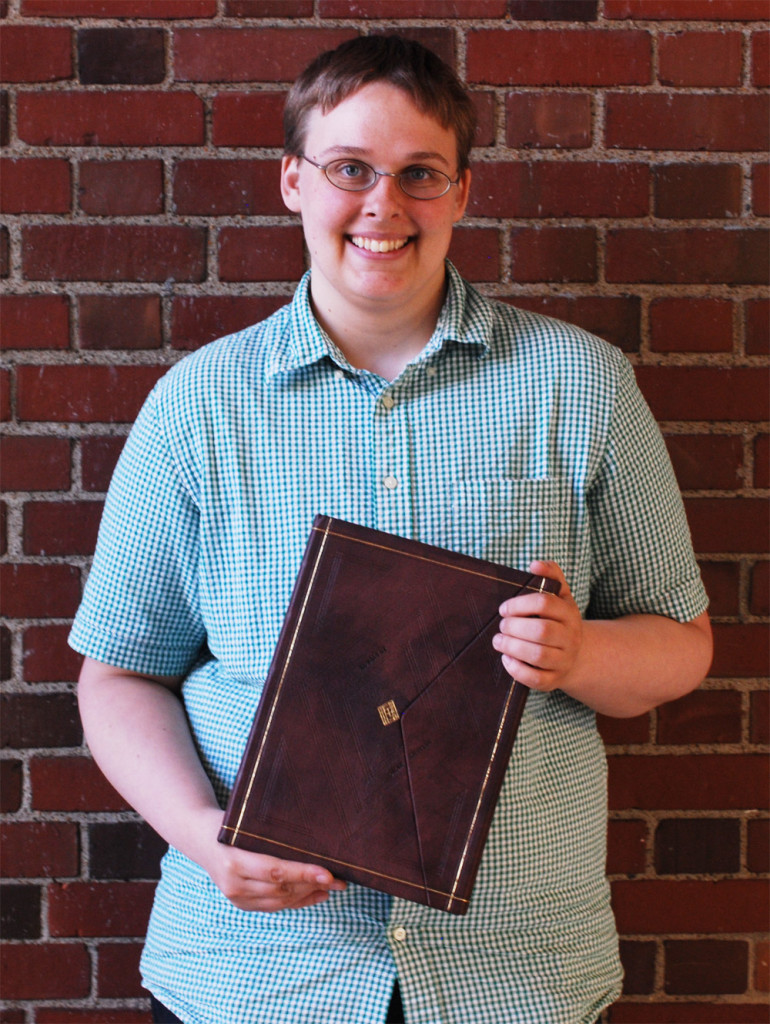
    Lauren Calcote’s interpretation of The Rubáiyát is brilliant. The text is notably one of the most famous pieces of Persian literature, which was translated into English for the first time by poet Edward Fitzgerald in 1859. Considering this relationship between its origins and the initial translation, Lauren played with the binding structure by combining a fine binding and Islamic binding.

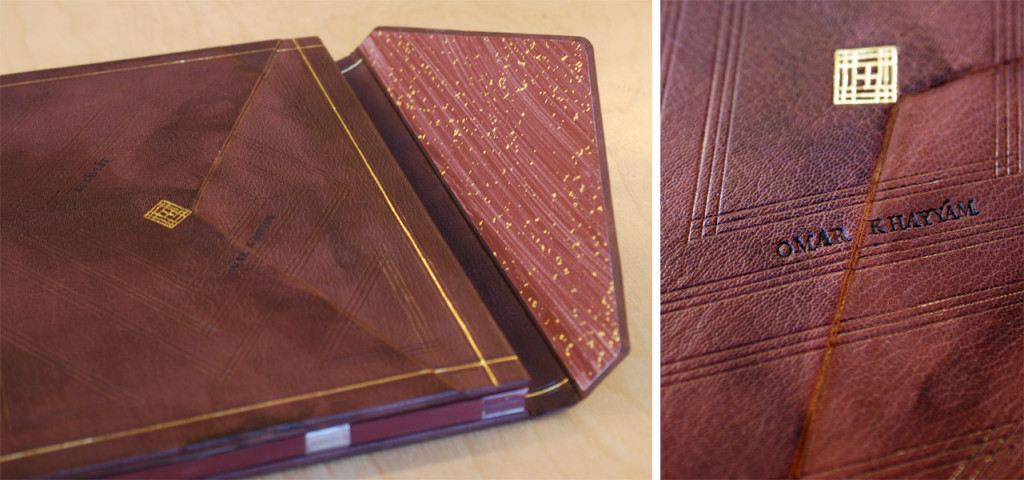
    The book is covered in fair goat that was hand-dyed by Lauren in a beautiful mottled aubergine purple. The fore edge flap speaks to the Islamic binding structure, but sits on top instead of underneath the front cover. The flap lays inside a well securely fastened with a hidden magnet.

    Rubaiyat2-LaurenCalcote

    Decoration on the front and back covers include gold and blind tooled lines laid out in a geometric design inspired by Persian patterns. The title is carbon-tooled on the front cover. The poet’s last name appears on the front of the flap and in the well.

    Other details include the custom-made endpapers reminiscent of those found in Islamic bindings. The paste down and fly leaf are hand painted with sprinkles of gold leaf. The edges of the text block are decorated in the same fashion. The headbands follow the Islamic chevron pattern around a round core.

    Planning this hybrid structure was an enjoyable challenge for Lauren, particularly finding the right fit for the flap by making sure it didn’t sit too proud. Another issue came during covering, Lauren initially wanted to cover the book in one full piece (from flap to front fore edge). Yet to achieve the desired height for the flap, Lauren choose to cover the base of the well with a separate thinner piece of leather. This seam is absolutely flawless and I would have never known if Lauren hadn’t explained the process to me. So bravo, Lauren.

    The last major design hurdle was where to tool and how to tool (mainly on the flap and well). She flip-flopped between tooling the well and leaving it bare. Lauren and I discussed how tooling the well was definitely the better decision. That the design works whether the flap is open or closed.

    After graduation, Lauren will be spending the next six months at the Boston Athenaeum as the 2015 Lisa von Clemm fellow.

    Joshua Crotty

    Rubaiyat-JoshuaCrotty

    On December 1, 1948 an unidentified man was found dead on Somerton Beach in Australia. This mystery was dubbed The Taman Shud Case, a phrase meaning ended or finished in Persian. Found in a hidden pocket of the man’s trousers was a printed scrap of paper, which turned out to be removed from the final page of The Rubáiyát of Omar Khayyám.

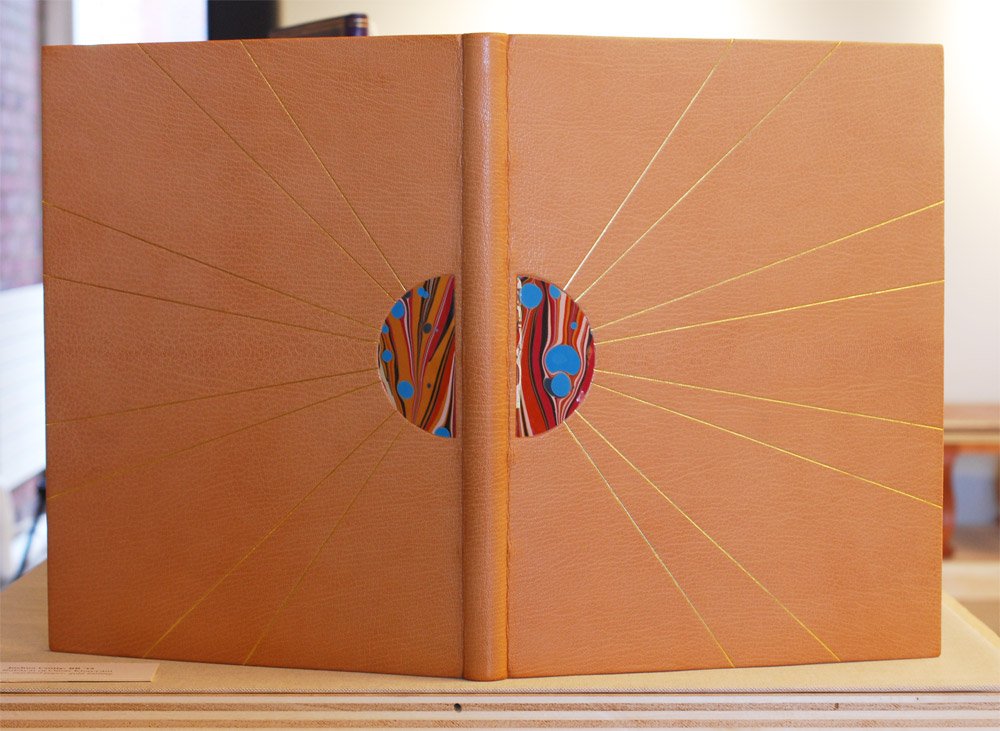
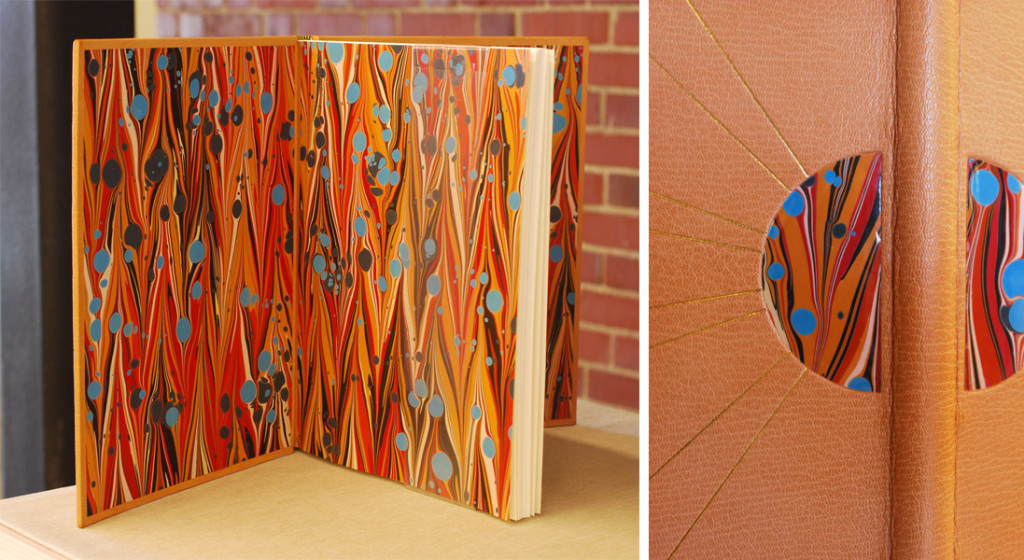
    This eerie tale is where Joshua Crotty drew his design inspiration. This simplistic design conveys a sense of heat, like being stranded on an Australian beach or Persian desert. The binding is covered in a beautiful sandy tan goatskin. The central inlaid design is created using marbled paper laminated to mylar representing a hot, golden sun. Gold tooled lines radiate from the half-circle inlays creating the rays of the sun.

    Rubaiyat2-JoshuaCrotty

    Joshua creates a fluid design by using the same marbled paper as the paste down and flyleaf. The head edge is gilded in the rough with gold leaf. I really love simple designs that are captivating and strong. Joshua’s inspiration is intriguing and really shines through; his simple design is ambiguous and holds a little bit of mystery.

    Joshua’s talents as a binder has already landed him in an impressive position as a hand bookbinder for the U.S. Government Publishing Office. His job is to serve the needs of Congress by creating finely crafted bindings to suit their needs. Joshua relocated to D.C. during his last semester at North Bennet Street School and this became one his major challenges during the binding process. He left behind a nice large bench to working on a kitchen table while also dealing with D.C.’s humidity; experiencing extended drying time made things a bit tough. These challenges didn’t hinder his ability to create crisp, clean gold tooled lines. Beautiful binding Joshua!

    Megan Gibes

    Rubaiyat-MeganGibes

    The Rubáiyát of Omar Khayyám was the title given by translator Edward Fitzgerald, whom I mentioned above. A ruba’i is a two-stanza with two parts per line, hence the word rubáiyát (a word derived from the Arabic language root for “four”) means “quatrains”.1

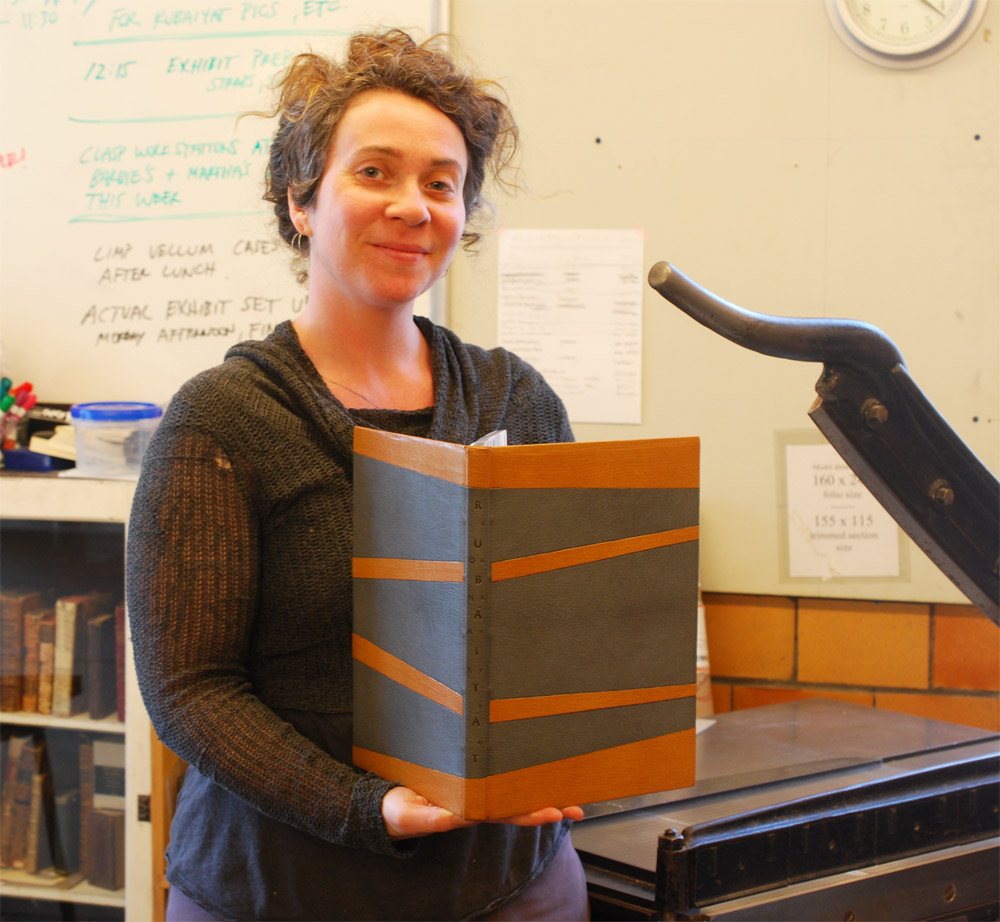
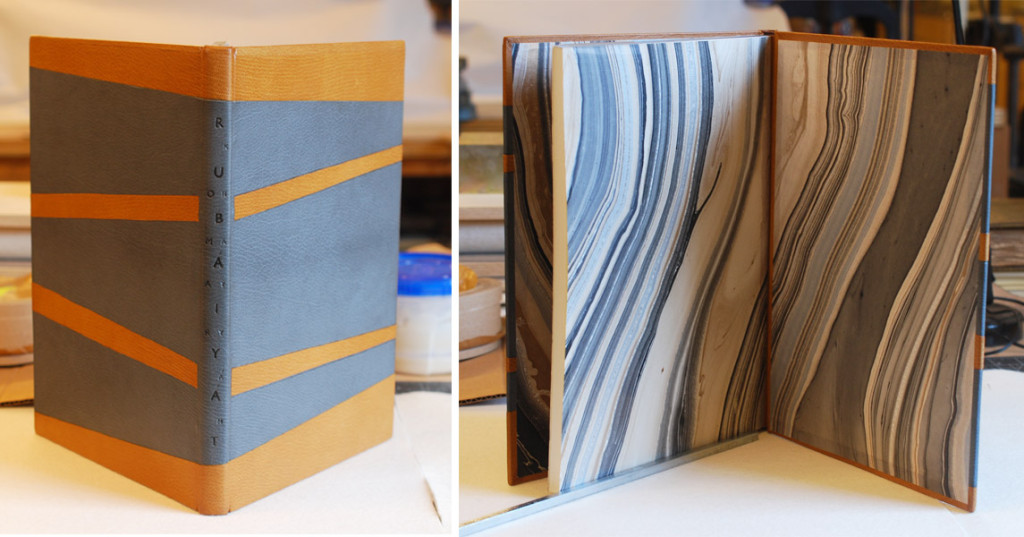
    As Megan Gibes describes the inspiration behind her design she explains that the poems are broken up into four lines with the crescendo occurring in the third line. The binding is covered in a medium gray goatskin with stripes of onlays in tan goatskin representing these four lines. The inner onlays are tooled, while the onlays near the head and tail are back-pared. This clean, minimalistic design is exactly what Megan wanted to achieve from the beginning as a way to juxtapose the grandiose bindings generally associated with The Rubáiyát.

    Rubaiyat2-MeganGibes

    The title is carbon-tooled down the length of the spine with Rubáiyát sandwiched between Omar and Khayyám (click on the image above for a better view). The head edge is shaded with graphite and gauffered with a thin line palette. The headbands are sewn in silk over a single parchment core. Megan sourced the perfect marbled paper to line the boards and fly leaf. This large-scale marbled design works so well with the format of this binding, while also tying in the color scheme Megan chose for the cover.

    Megan and I chatted about the challenges of creating a fine binding, how overwhelming the process can seem. Megan’s strategy was to isolate each step and to only move forward when she felt completely satisfied. One challenge that arose came during the paring process and some miscalculations. By edge paring the leather a bit too short, this left with a visual drop in the leather after covering. Megan added a patched onlay, which fixed the situation and actually looks quite seamless.

    After graduation, Megan will be moving across the country to Santa Barbara, California. She’s been hired as the Head Binder for Neve Albums where she’ll be producing unique albums, guests books and custom boxes. Neve Albums brought on Megan to help establish an in-house bindery to help expand their business. Best of luck Megan, sounds like a great gig!

    Shannon Kerner

    Rubaiyat-ShannonKerner

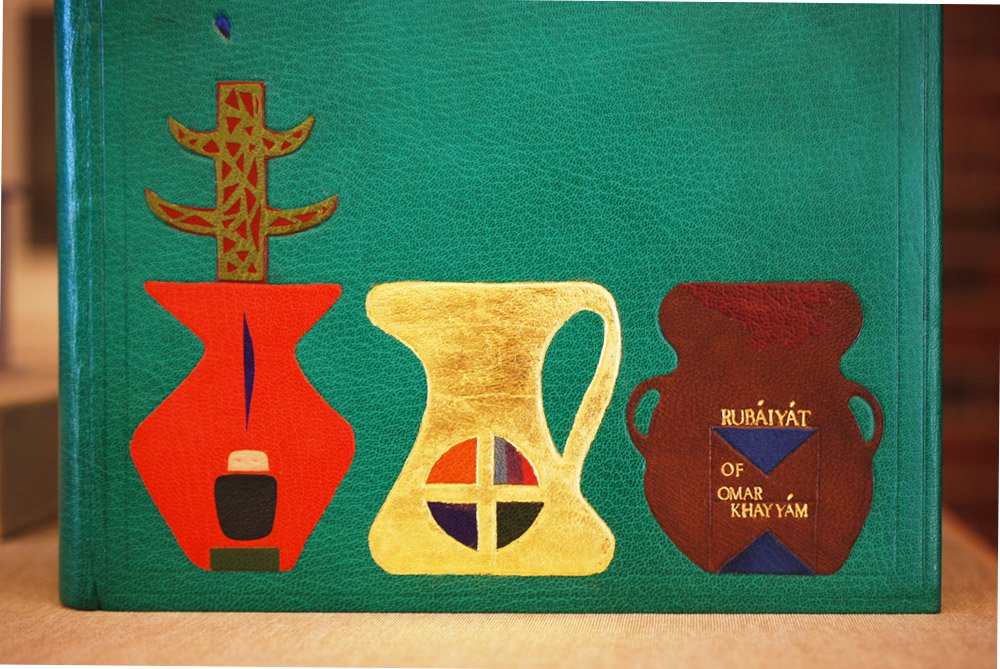
    Omar Khayyám lived during the 11th and 12th century making a living as a mathematician, astronomer, philosopher and poet. His poetry includes several themes such as life, death and love. For her design, Shannon Kerner reinterpreted these themes using symbols found on Southwestern Native American rock wall art.

    Rubaiyat2-ShannonKerner

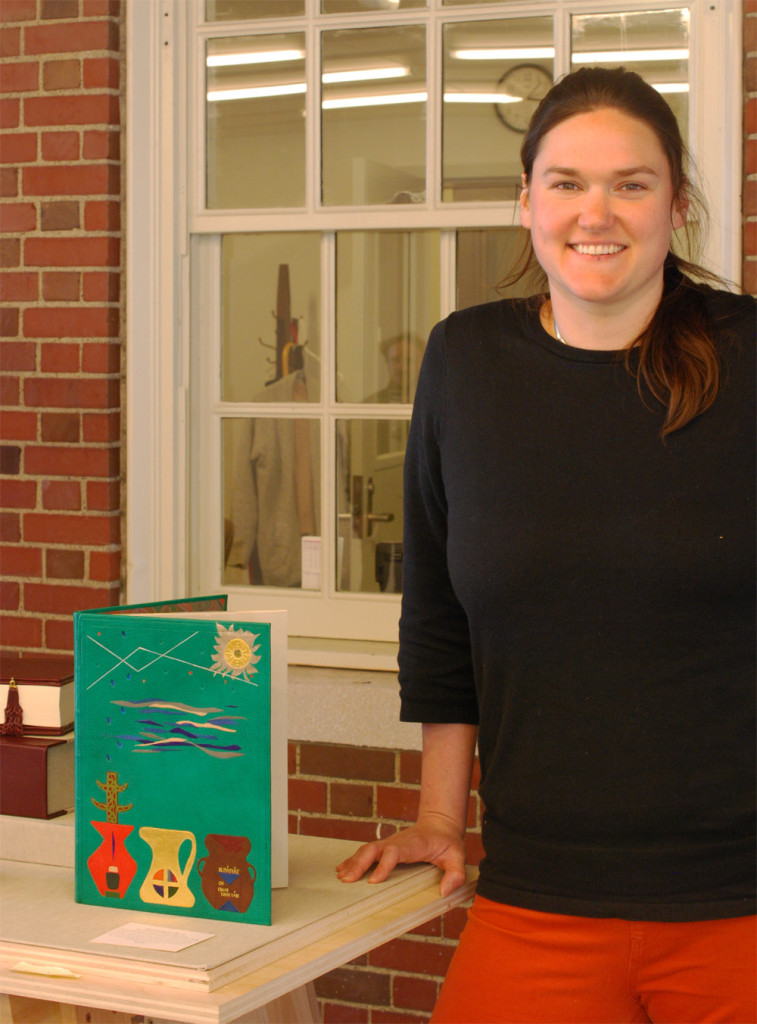
    The shapes of each vase is derived from typical Persian styles. The first vase represents the spirit of the ancestor with the tree of good life growing from the ancestor and falling rain. The symbol on the center vase represents the virgin. The final vase includes the title tooled in gold along with the symbol for the water clan, which is represented by two inverted triangles inside of a rectangle. This final symbol, just like the vases, are symbols for water and life, which circles back around to the first vase.

    As I mentioned before, Omar Khayyám worked as an astronomer and was tasked with reforming the calendar in order to minimize seasonal errors; this was something Shannon wanted to reflect in her design. The top half of the design includes a sun created through surfacing gilding palladium and gold. The rain passes through a dreamy cloudscape and blind tooled stars representing the night sky.

    Rubaiyat3-ShannonKerner

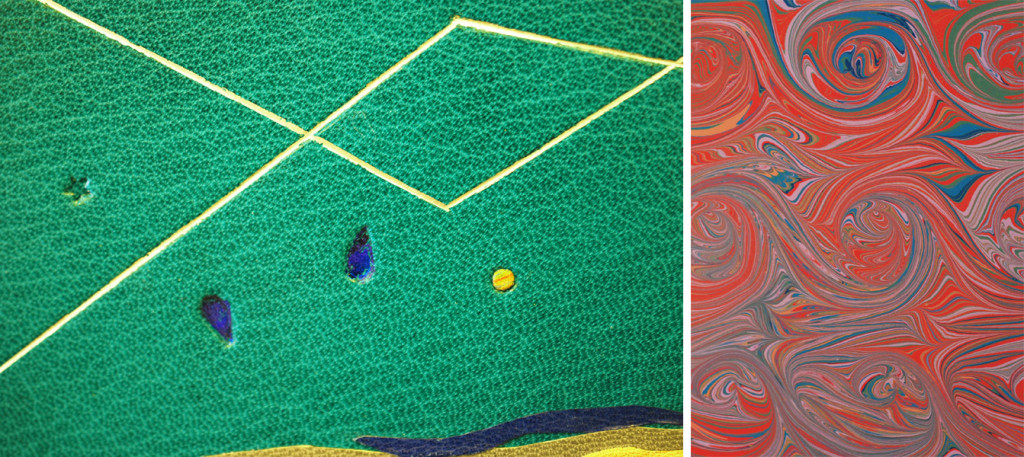
    Shannon’s binding is bound in a bright teal goatskin with several layered onlays. Other decorative elements include surface gilding, foil tooling and blind tooling. The head edge was rough edge gilt. The paste down and flyleaf are covered with a hand marbled paper made by Shannon (detail shown above).

    Shannon employed a variety of techniques in her binding. One particular element that I found intriguing was her use of three different colored foils within the teardrop tool, which offers an elegant subtly to the design. As we chatted about her process, she pointed out the challenges presented when creating the sun. The center is surface gilt with gold leaf, while the outer rays are surface gilt with palladium leaf. Butting up these two leaves meant that the Frisket (a masking film) would be placed on the gold leaf. This film pulled up some of the leaf, but Shannon successfully mended any losses creating a striking image for her overall design.

    Come graduation, Shannon is looking forward to her next step and where it might take her. She is anxiously awaiting to hear the results of prior interviews.

    Lindsay Nakashima

    Rubaiyat2-LindsayNakashima

    Earlier this year, Boston College exhibited the work of Mark Esser, who was the first instructor at North Bennet Street School and is apart of a lineage of master bookbinders. His work greatly inspired Lindsay Nakashima as she approached her design for The Rubáiyát. Lindsay also planned to utilize both gouges and palettes as a challenge to work with the tools she has been introduced to over the course of the second school year.

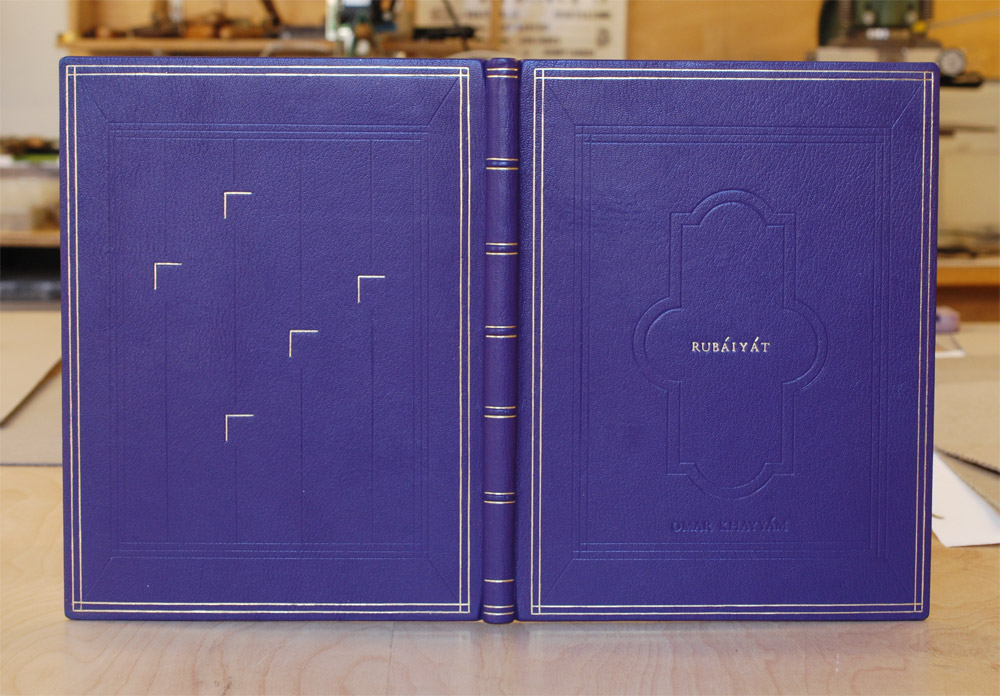
    The binding is covered in a vibrant purple chieftain goatskin from Hewit (best represented in the image below). The other students chose to use Harmatan goatskin for their bindings, but Lindsay was attracted to not only the lush color, but the heavy grain. This was also a great opportunity to play around with a different type of leather, to get a sense of how it can be manipulated and tooled.

    Rubaiyat-LindsayNakashima

    The head edge is rough edge gilt with French double core headbands wrapped in silk. Zerkall paper was used for the paste down and fly leaf. Lindsay’s binding has quite a classic, clean look. She emphasizes the back corner, which offers a more elegant (or dare I say more feminine) feel for the size of the binding.

    Lindsay’s most challenging aspect of this process was the gold tooling, which most binders can attest to its difficulties. Yet tooling on an unfamiliar leather can heighten the challenge. Lindsay noted that the chieftain goat felt less spongy and less susceptible to making an impression. But Lindsay plowed through the process and created beautifully tooled lines.

    After graduation, Lindsay will be moving back home to Austin, Texas where she’ll be setting up a bindery space. Her intentions will be to open this space for teaching simple workshops while also bringing in restoration commissions under the name Nakashima Books. Best of luck, Lindsay.

    Jacqueline Scott

    Rubaiyat-JacquelineScott

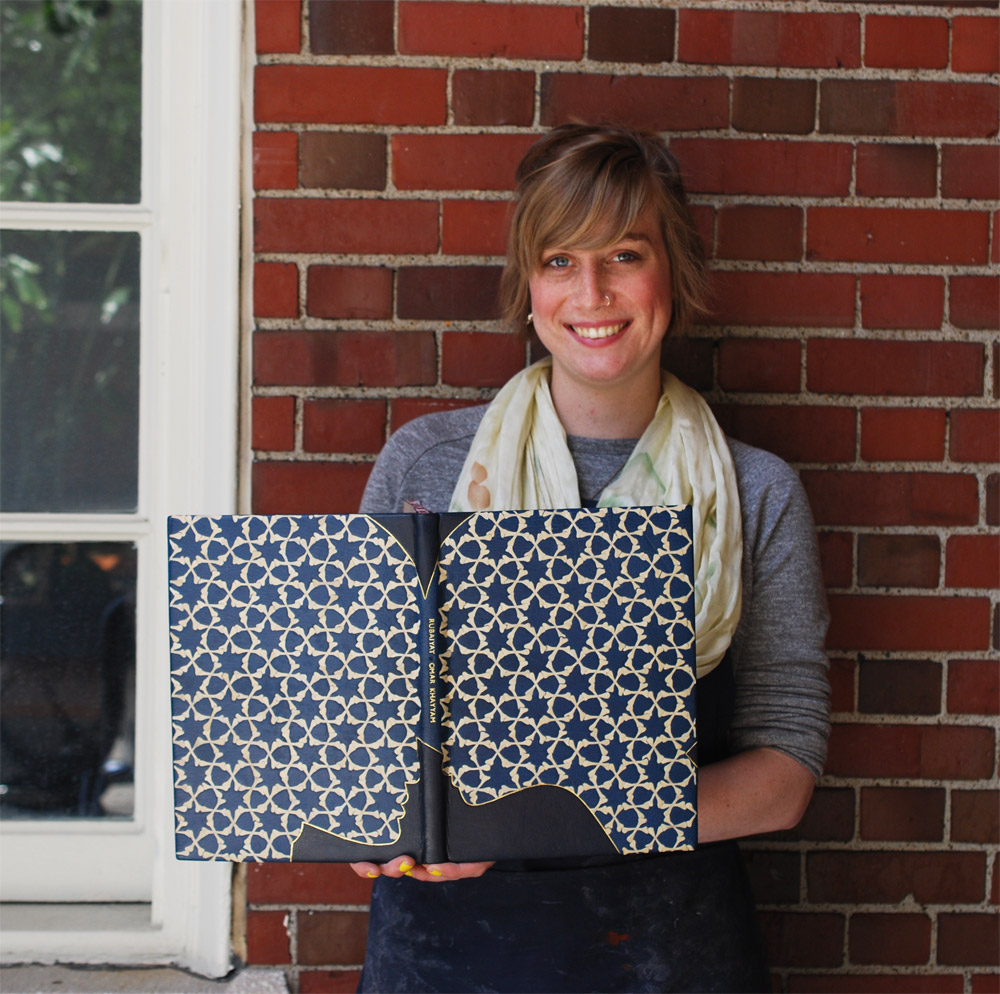
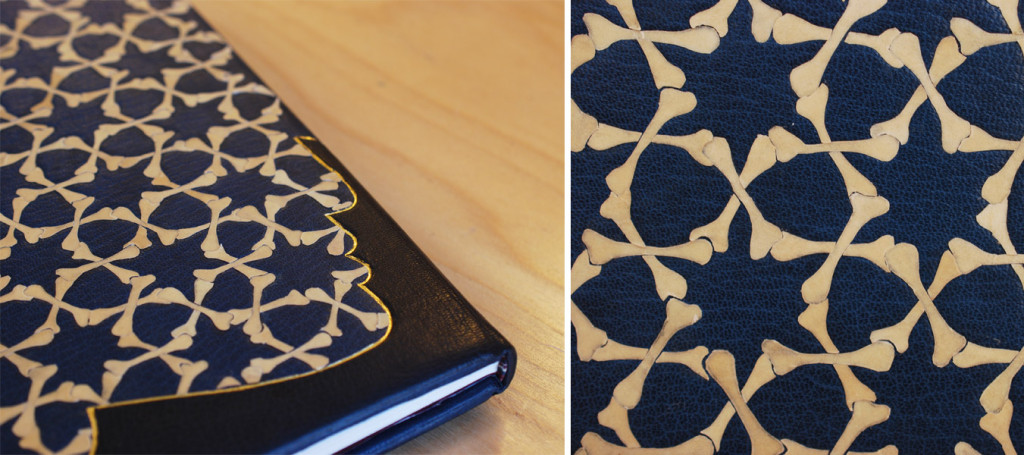
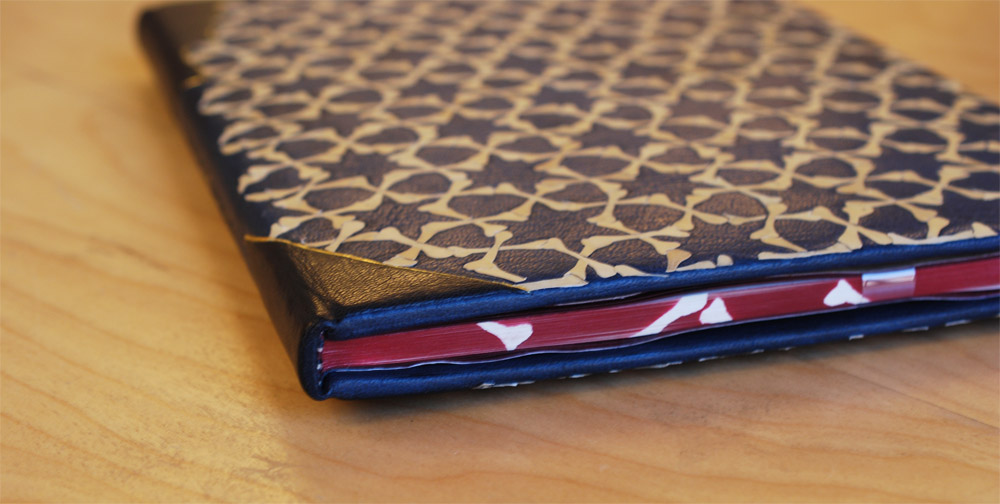
    Death is a reoccurring theme in Khayyám’s poetry and one that inspired many of the students in this exhibit. Jacqueline combined this theme with a love story threaded throughout the text. These themes are represented by the profile of a couple embracing and bones. Jacqueline’s book is bound in a blue goatskin with over 400 parchment back-pared onlays, these parchment bones create a classic Arabic geometric design.

    Jacqueline’s work with the parchment is quite impressive and I asked about her approach to using this unconventional material as a back-pared onlay. In her initial tests she overlapped two bones, but this created too much bulk and tore during the paring process. She also backed the parchment with tissue using gelatin. Jacqueline used this tissue as a barrier between the PVA and parchment, plus the tissue increases the opaqueness of the onalys. A little setback occurred during covering when the gelatin lifted from the moisture in the paste, but Jacqueline was able to reattach any raised onlays.

    Rubaiyat2-JacquelineScott

    The shape of the couple is accented by dark blue gold tooled onlays. The title is gold tooled down the length of the spine. The head edge is airbrushed with a deep red, bone shapes are masked out revealing the white of pages underneath. The boards are lined with matching edge-to-edge doublures and cork paper fly leaves.

    Rubaiyat3-JacquelineScott

    After graduation, Jacqueline will begin the first of three internships. Starting with a month-long internship at the Francis Loeb Library which is affiliated with the Harvard Design School. I’m looking forward to seeing Jacqueline later in the summer at the University of Virginia during her second internship while I’ll be attending Rare Book School.

    Jeff Altepeter

    Rubaiyat-JeffAltepeter

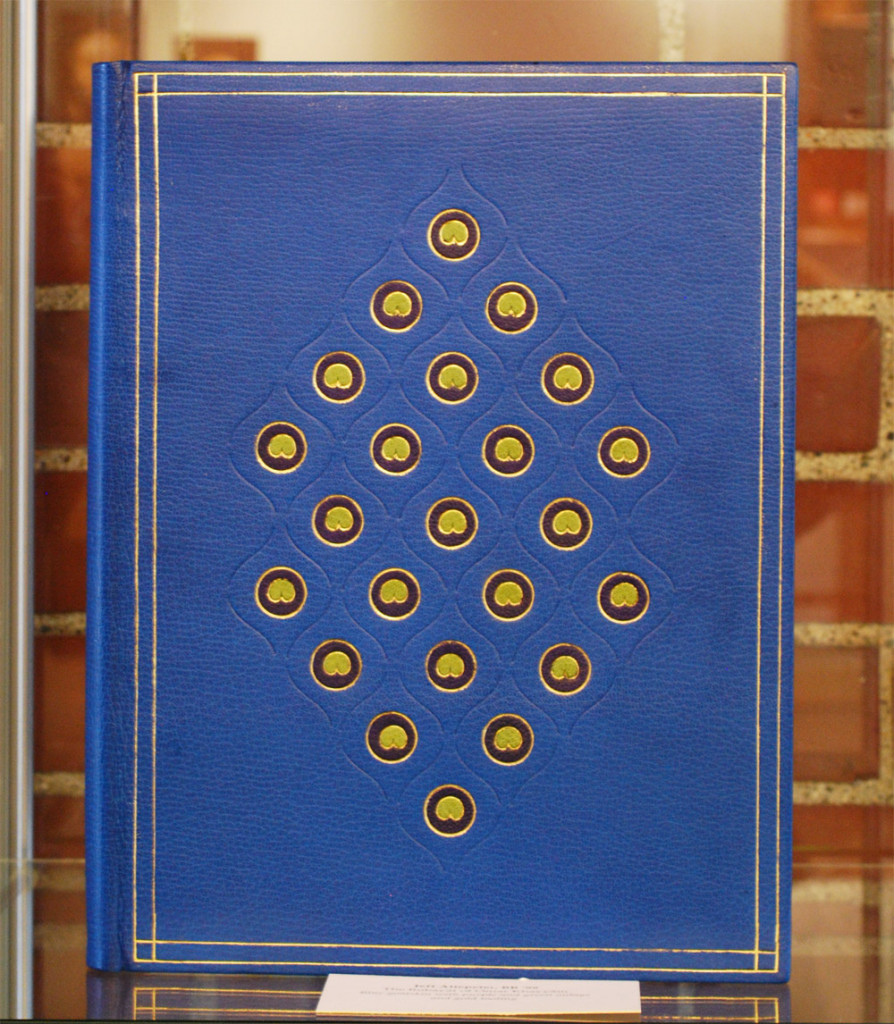
    The success of the student’s bindings are due to the instruction from Jeff Altepeter and I thought it best to end this post with his colorful binding. Jeff drew inspiration from The Great Omar. In 1909, Sangorski & Sutcliffe was commissioned to create a sumptuous binding for The Rubáiyát of Omar Khayyám. Given carte blanche and a limitless budget, the remarkable firm created the most ornate binding with thousands of jewels, complex gold tooled designs and leather onlays. Upon completion in 1911, the binding was shipped a year later to New York by way of the Titanic.

    Jeff pulled a single element from “The Great Omar”: the peacock (also a common motif on Sangorski & Sutcliffe bindings). His abstract interpretation of the peacock feather is laid out in a lozenge-like pattern. Instead of the traditional straight lines he employed the ogee finishing tool, which is a long, thin “S” shape. This tool created a very elegant, feather-like border around the “eye”. This center shape is made up of two gold tooled onlays. The inner one is tooled from a custom made finishing tool. Jeff is a master at crafting his own finishing tools; he made a few variations of the tool before settling on an open design rather than a closed one.

    The book is bound in a brilliant blue goatskin with an airbrushed head edge and hand sewn French double core headbands in silk. Marbled paper lines the inside of the covers and flyleaves.

    I asked the students about their challenges during the binding process and I posed the same question to Jeff. In an ideal situation, a binder wants a comfortable amount of time between each step. Yet for an instructor these steps might get rushed in order to show the process to students in a timely fashion. And there are less chances to tweak your design within these time constraints. But I think Jeff was able to capture the spirit of The Great Omar.

    So there you have it. My best to the graduating class of 2015 as you enter the world of bookbinding and conservation!

    1 Wikipedia


  • My name is Erin Fletcher, owner and bookbinder of Herringbone Bindery in Boston. Flash of the Hand is a space where I share my process and inspirations.
    The StudioNewsletterInstagramEmail me
  • Archives